How to Use a DC Power Supply for Mobile Diagnosis
How to Use a DC Power Supply for Mobile Diagnosis
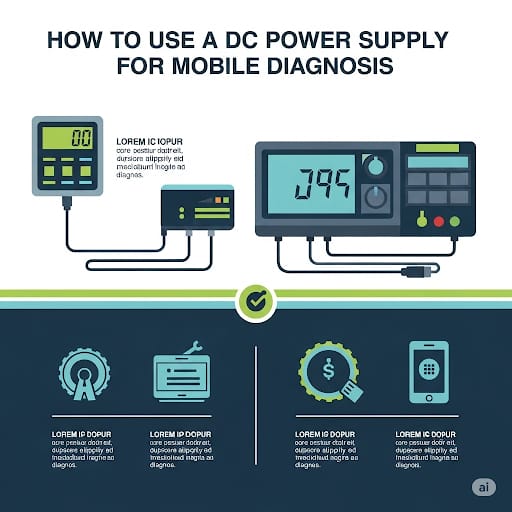
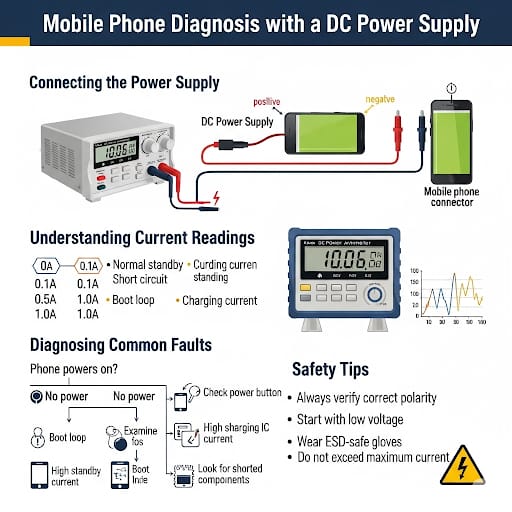
DC Power Supply mobile repairing ka ek bohot important tool hai, jo aapko mobile ke power consumption aur faults ka pata lagane me madad deta hai. Is ka sahi istemal diagnose process ko fast aur accurate banata hai. Aayiye step-by-step samajhte hain:
1️⃣ DC Power Supply ka Purpose Samajhna
Mobile phone battery ki jagah DC power supply connect karke aap phone ki current reading dekh sakte hain. Is se pata chalta hai ke phone short hai, on ho raha hai ya kisi stage pe stuck hai.
2️⃣ Connection ka Sahi Tariqa
Battery connector par positive (+) aur negative (-) terminal identify karein.
DC power supply ka red wire positive aur black wire negative terminal me connect karein.
Voltage 4.2V set karein (mobile battery ke standard ke mutabiq).
3️⃣ Current Reading Samajhna
0 Amp: Phone me koi activity nahi, ya connection galat hai.
0.02–0.05 Amp: Standby mode me phone.
0.3–0.5 Amp: Phone boot ho raha hai.
High Amp (1A ya zyada): Short circuit ya heavy load issue.
4️⃣ Fault Diagnosis Examples
Agar phone on nahi hota aur current direct high chala jata hai → short circuit.
Agar phone boot me stuck ho aur current fluctuate ho → software ya hardware fault.
5️⃣ Safety Tips
Voltage hamesha mobile battery ke standard ke mutabiq rakhein.
Probes galat polarity me na lagayen.
Power supply ka sudden high voltage phone ko damage kar sakta hai.
Conclusion:
DC power supply mobile diagnosis ka ek must-have tool hai jo aapko short detection, boot issues aur faulty components identify karne me bohot madad karta hai. Agar aap ise sahi tariqe se use karna seekh lein to repairing ka accuracy level kaafi improve ho jata hai.
Iski infographic bna dy
Proximity Sensor Repair, Mobile Proximity Sensor Not Working, Proximity Sensor Causes and Fix, Smartphone Sensor Repair Guide, Android Proximity Sensor Solution, iPhone Proximity Sensor Issue, Mobile Sensor Problem Repair, Mobile Repairing Tips, Sensor Replacement Guide, Mobile Repair Blog