Camera Issues Fixing Precautions Every Mobile Technician Must Follow

Camera Issues Fixing Precautions Every Mobile Technician Must Follow

Aaj kal har mobile phone ka sabse zyada use hone wala feature camera πŸ“· hai. Log apne mobile ka camera selfie 🀳, video recording πŸŽ₯, aur social media ke liye use karte hain. Lekin jab camera issues aate hain, to customer ka patience test hota hai πŸ˜…. Ek mobile repairing technician ke liye yeh kaam bohot delicately karna padta hai, warna thoda sa galat step camera ko permanently damage kar sakta hai 🚫.

Yahan main aapko camera repair ke waqt ki zaroori ihtiyaat bata raha hoon jo har technician ko follow karni chahiye

Meta Description

Learn the essential precautions mobile repair technicians must follow while fixing camera issues. Avoid damage, ensure quality repairs, and keep customers happy.

Camera Issues Solve Karne Ke Dauran Kya Kya Ehtiyaat Karni Chahiye

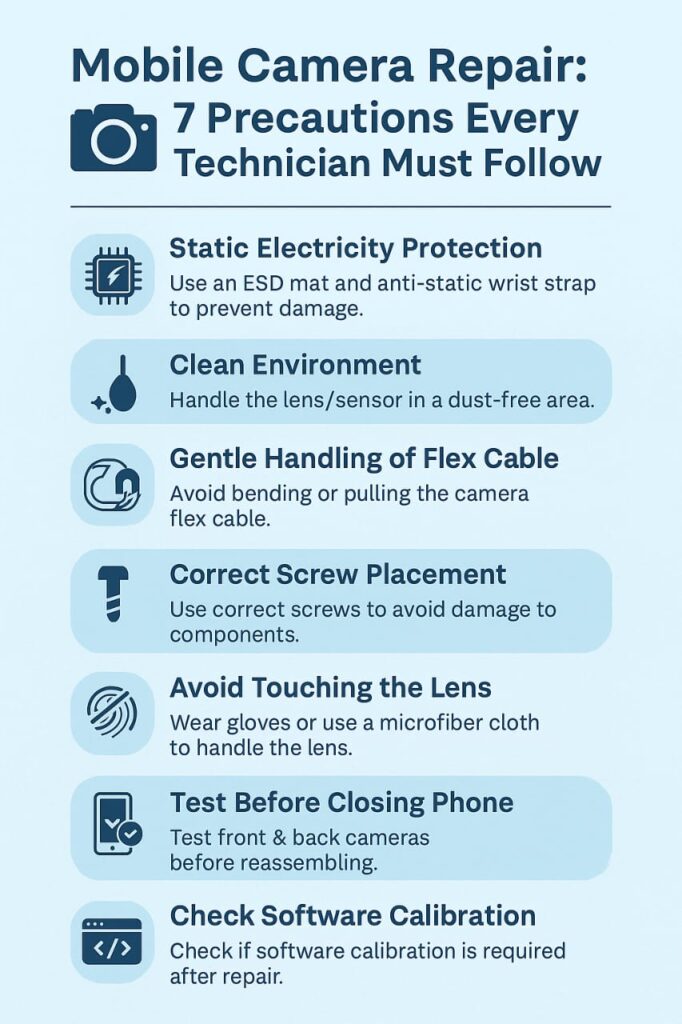
Mobile repairing ka kaam accuracy aur safety ka demand karta hai β€” especially jab baat camera issues ki ho. Aaj hum baat karenge un important precautions ki jo har technician ko follow karni chahiye, taake repair ka result best aaye aur phone ki quality safe rahe.


1️⃣ Static Electricity Se Bachao

πŸ“ Precaution: Repairing ke waqt ESD mat aur anti-static wrist strap ka use karein.
⚠ Kyun? Static electricity easily camera module ko damage kar sakti hai.


2️⃣ Clean & Dust-Free Environment

πŸ“ Precaution: Camera lens ya sensor handle karte waqt hamesha dust-free environment mein kaam karein.
🧹 Kyun? Thoda sa dust particle bhi image quality ko blur kar sakta hai.


3️⃣ Gentle Handling of Flex Cable

πŸ“ Precaution: Camera module ke flex cable ko zyada bend ya pull na karein.
πŸ’‘ Kyun? Flex cable easily damage hota hai aur phir camera detect hi nahi hota.


4️⃣ Correct Screw Placement

πŸ“ Precaution: Har screw ko uski correct position par lagayein.
πŸ”© Kyun? Galat screw use karne se motherboard ya camera bracket damage ho sakta hai.


5️⃣ Avoid Direct Finger Touch on Lens

πŸ“ Precaution: Camera lens ko hamesha gloves pehn kar ya microfiber cloth ke saath handle karein.
πŸ›‘ Kyun? Fingerprints permanent smudges chhod dete hain jo easily clean nahi hote.


6️⃣ Proper Testing Before Closing the Phone

πŸ“ Precaution: Repair ke baad phone ko complete assemble karne se pehle camera test karein (front & back dono).
βœ… Kyun? Baad mein dobara kholne ka risk aur time waste bach jaata hai.


7️⃣ Software Calibration Check

πŸ“ Precaution: Agar camera change ho raha hai to software calibration ka option zarur check karein.
πŸ’» Kyun? Kuch phones (specially iPhones) mein calibration ke bina quality low hoti hai.


πŸ’‘ Pro Tip: Hamesha customer ko repair ke baad short demo dikhayein taake unka trust aur satisfaction barhe.


πŸ“Œ Tags (SEO Ready)

mobile camera repair tips, precautions in mobile repairing, camera module replacement safety, mobile repair guide, camera fixing precautions, mobile repairing tips, safe phone repair

Mobile Liquid Damage – Save Your Phone in the First Golden Hours

Mobile Liquid Damage – Save Your Phone in the First Golden Hours

Dropped your phone in water? Learn the critical first-aid steps to save your mobile after liquid damage. This expert guide explains what to do within the golden hours, including do’s and don’ts, DIY tips, and when to seek professional help.
Introduction:
Agar aapka mobile liquid se damage ho gaya hai, toh sab se pehle aapko samajhna hoga ke Golden Hours kya hote hain. Ye woh precious time hota hai jisme agar aap sahi steps follow karte hain, toh aap apne mobile ko bachane mein kaafi madad kar sakte hain. Liquid damage ke baad, time ke saath phone ke internal components kharaab hote hain, isliye jaldi action lena bohot zaroori hota hai. Aaj ki guide mein hum discuss karenge ke liquid damage ke baad mobile ko safe karne ke liye aapko kya steps lene chahiye aur kaise aap apne phone ko bachane mein successful ho sakte hain.


⏳ What are the Golden Hours?

Golden Hours wo initial 1-2 hours hain jab mobile ko liquid damage hota hai. Agar aap iss time ke andar action lete hain, toh aapke phone ke major components bach sakte hain, jaise motherboard, battery, and ICs. Iss waqt agar aap phone ko turant dry karte hain, battery ko remove karte hain, aur proper cleaning karte hain, toh chances hain ke phone damage se bach jaye.


πŸ§‘β€πŸ”§ Step-by-Step Guide to Save Your Mobile After Liquid Damage:

Step 1: Power Off Immediately

Pehla step ye hai ke aap apne mobile ko immediately power off kar lein. Liquid ki wajah se short circuit ka risk hota hai, aur agar phone chal raha ho, toh liquid ke andar components ko aur zyada damage ho sakta hai.

Step 2: Remove Battery and SIM Card

Battery ko nikaalna bohot zaroori hai, kyunki liquid battery ke andar bhi enter kar sakta hai aur power circuit ko short kar sakta hai. SIM card ko bhi nikaal lein, takay wo liquid se affect na ho.

Step 3: Dry the External Surface

Ek dry cloth ya microfiber cloth se mobile ke external surface ko gently dry karein. Phone ko shake na karein, taake liquid aur andar na chala jaye.

Step 4: Use Silica Gel or Rice (If You Don’t Have Silica Gel)

Agar aapke paas silica gel packets hain, toh mobile ko silica gel mein rakh dein. Silica gel liquid ko absorb karta hai aur aapke phone ko dry karta hai. Agar silica gel available na ho, toh uncooked rice bhi ek alternative hai. Apne phone ko rice mein daal kar 48 hours ke liye rakh dein.

Step 5: Don’t Use Hair Dryer or Heat Source

Hair dryer ya kisi bhi heat source ka use na karein. High heat se phone ka motherboard aur ICs kaafi damage ho sakte hain. Room temperature mein phone ko naturally dry hone dein.


πŸ•΅οΈβ€β™‚οΈ Diagnosis and Inspection:

  1. Check the Charging Port:

Charging port ko dekh kar ensure karein ke usmein koi liquid ya corrosion na ho. Agar liquid andar ho, toh phone charge nahi hoga.

  1. Inspect the Screen:

Agar screen pe liquid damage hai, toh screen ko remove kar ke inspect karein. Agar screen flicker ho rahi ho, ya display proper na ho, toh screen replacement ki zarurat ho sakti hai.

  1. PCB Inspection:

Mobile ka PCB inspect karna bohot zaroori hai. Agar PCB par corrosion ho ya liquid trace ho, toh phone ko cleaning ki zarurat hogi. Aapki service centre ya professional technician se is process ko karwana chahiye.


πŸ”§ Pro Tips for Handling Liquid Damaged Phones:

  1. Use Isopropyl Alcohol: Isopropyl alcohol se mobile ka internal cleaning kiya ja sakta hai. Ye liquid aur corrosion ko remove karne mein madad karta hai.
  2. Avoid Pressing the Power Button: Agar aap mobile ko press karte hain, toh aur liquid andar chala ja sakta hai. Mobile ko touch na karein jab tak completely dry na ho jaye.
  3. Seek Professional Help: Agar aap mobile ko khud repair karna nahi jante, toh ek professional mobile repairing technician se madad lein.

⚠️ Common Mistakes to Avoid:

  1. Power On the Phone Too Soon: Jab tak aap puri tarah se phone ko dry nahi kar lete, usay on na karein.
  2. Using External Heat Sources: Hair dryer ya heat guns ko use na karein.
  3. Not Cleaning the Phone Properly: Agar aapne phone ko sahi se clean nahi kiya, toh liquid internal components ko damage kar sakta hai.

πŸ§‘β€πŸ’» Conclusion:

Liquid damage ke baad apne phone ko save karne ka sabse important part hota hai jaldi action lena. Golden hours ko miss na karein, aur phone ko turant off kar den aur sahi cleaning steps follow karein. Agar aapke paas proper tools aur techniques hain, toh aap apne phone ko repair karne mein successful ho sakte hain. Lekin agar problem bohot serious ho, toh mobile repairing expert se help lena zaroori hota hai.


SEO-Friendly Tags (Copy & Paste):
Mobile Liquid Damage, How to Save Mobile from Water, Mobile Repairing, Mobile Repair after Liquid Damage, How to Fix Water Damaged Mobile, Liquid Damage Solutions, Mobile Repair Guide, Mobile Repair Tips, Water Damage Mobile Phone Repair, Mobile Phone Repairing Ti

Touch Screen Problem Aur Iska Hal – Step by Step Guide

Meta Description:

Touch screen kaam nahi kar rahi? Mobile screen touch issue ka asaan hal janiye is guide mein – DIY tips, expert advice, aur safety instructions ke saath. Best solution for unresponsive touch screen problems in Urdu!


Introduction

Aaj ke smartphones ka sabse essential hissa hota hai unka touch screen. Lekin sochiye agar aapka phone respond karna band kar de ya screen lag kare? Na scrolling kaam kare na typing ho. Frustration ka level sky-high ho jata hai! Is article mein hum step-by-step batayenge ke touch screen problem kaise diagnose karein aur uska hal kaise nikalein – professional aur safe tareeqe se.


Step 1: Problem Ko Pehchaaniye

Sabse pehle yeh samajhna zaroori hai ke issue hardware ka hai ya software ka. Kuch aam symptoms:

  • Screen par touch ka response slow ya bilkul band ho jana
  • Screen ka specific area kaam na karna
  • Ghost touch (screen khud ba khud operate hona)
  • Lag ya freeze hona jab bhi touch karein

Step 2: Software Check Karein

Bohat dafa screen issue kisi software glitch ki wajah se hota hai. Yeh solutions try karein:

βœ… Restart Phone – kabhi kabhi temporary bug hota hai
βœ… Safe Mode – check karein third-party apps ki wajah se issue to nahi
βœ… Software Update – purana firmware touch errors create kar sakta hai
βœ… Factory Reset – extreme case mein, lekin pehle backup zaroor lein


Step 3: Screen Test Apps Use Karein

Google Play Store mein kuch free apps available hoti hain jaise:

  • Touch Screen Test
  • MultiTouch Tester
  • Display Tester

In apps ki madad se aap verify kar sakte hain ke screen kis area mein kaam nahi kar rahi.


Step 4: Hardware Issues Check Karein

Agar software sab theek hai, to ab hardware side se check karein:

πŸ”§ Loose Connection – phone girne ya pressure lagne se touch connector loose ho sakta hai
πŸ”§ Water Damage – agar phone bheeg gaya ho to screen short ho sakti hai
πŸ”§ Damaged Screen – cracks ya burn spots usually hardware fault ka indication hoti hain
πŸ”§ Battery Issue – kabhi kabhi swelling battery screen ke pressure mein interfere karti hai


Step 5: Safe Repair Process

Agar aap khud technician hain ya seekh rahe hain, to safe repairing ke liye yeh steps follow karein:

  1. Power Off Phone – safety ke liye zaroori hai
  2. Back Cover & Battery Remove (agar removable ho)
  3. Touch Connector Check – carefully disconnect karein, clean karein, phir reconnect
  4. Multimeter se Continuity Check karein
  5. Display Replace – agar sab kuch fail ho jaye to new screen lagana behtareen hal hai

Bonus Tip: Screen Protector Use Karein

Agar aap chahte hain ke future mein touch problem na aaye, to high-quality screen protector ka istemal karein. Yeh na sirf scratches se bachaata hai, balki minor water splashes ya pressure se bhi touch ko protect karta hai.


Conclusion

Touch screen problems har kisi ke saath ho sakti hain, lekin ghabrane ki zarurat nahi. Upar diye gaye tips aur methods se aap asaani se samajh sakte hain ke problem kaha hai aur uska hal kya hai. Agar phir bhi issue solve na ho, to certified technician se consult karna behtar hai.

Proper Use of Tools and Safety Tips in Repairing – Every Technician Must Know!

βœ… Meta Description

Tools ka proper use aur safety tips in repairing – Learn how to safely use mobile repairing tools like multimeter, soldering iron, hot air gun, and avoid common mistakes. Full safety guide only on aaplusmobiles.com.


πŸ”§ Repairing Mein Tools Ki Importance – Pehle Samajhna Zaroori Hai

Mobile repairing koi magic nahi – ye aik proper skill hai jisme tools ka sahi use aapko pro technician banata hai. Lekin agar aap ye tools galat tareeqe se use karen, to sirf phone hi nahi, kabhi kabhi board bhi damage ho sakta hai… ya khud ko bhi injury ho sakti hai! 😬

Is liye har repairing student ko ye samajhna bohat zaroori hai ke tools ka sahi use kya hai aur unse safe repairing kaise ki jati hai.


πŸ”© Common Tools Aur Unka Proper Use

1️⃣ Multimeter – Testing Ka King!

Multimeter se aap voltage, continuity, aur resistance measure karte hain.
Use Tip: Always set the correct mode (DC/AC/Continuity) before testing.
Mistake to Avoid: Incorrect setting se board short ho sakta hai.


2️⃣ Soldering Iron – Connection Expert

Isse aap components ko PCB par solder karte hain.
Use Tip: Use a clean tip and keep the temperature moderate (280Β°C–350Β°C).
Mistake to Avoid: Overheating can burn the board or damage components.


3️⃣ Hot Air Gun – IC Removal Tool

IC ko remove/replace karne ke liye perfect tool.
Use Tip: Use with nozzle and proper airflow setting.
Mistake to Avoid: Direct high heat can lift nearby components.


4️⃣ Tweezers & Magnifying Lamp

Micro-level components handle karne mein madad karte hain.
Use Tip: Non-magnetic and anti-static tweezers use karein.
Mistake to Avoid: Pressure zyada dena se components toot sakte hain.


5️⃣ Jumper Wire & PCB Cleaner

Track repair aur board cleaning ke liye must tools.
Use Tip: Jumper ko neatly lagayein aur cleaner se gently safai karein.
Mistake to Avoid: Zyada liquid ya force use na karein.


⚠️ Safety Tips – Technician Ki Zindagi Ki Hifazat!

πŸ’‘ Anti-Static Wrist Band Use Karein – Board ko static shock se bachata hai
🧯 Fire Safety – Workshop mein fire extinguisher zaroor ho
🧀 Gloves Aur Mask Pehnein – Dust ya chemical exposure se bachne ke liye
🚫 Don’t Repair When Tired – Ghaltiyaan zyada hoti hain jab aap thakay hue hon
πŸ”Œ Power Off Always – Phone ko repair se pehle disconnect karein


πŸ“‰ Galtiyan Jo Aksar Beginners Karte Hain

❌ Tools saste aur local use karna
❌ Without multimeter diagnose karna
❌ Direct power connect karna bina testing ke
❌ ESD safety ignore karna
❌ Tutorial videos dekh kar bina practice ke kaam start karna


🧠 Summary – Smart Bano, Safe Repair Karo!

Agar aap mobile repairing ko professional level par le jana chahte hain, to tools ka sahi use aur safety rules follow karna sabse pehla step hai. Sirf repairing kar lena kaafi nahi – smart aur safe technician banna important hai.

Tools ka ghalat use na sirf mobile ko nuksan deta hai, balkay aapki reputation bhi kharaab kar sakta hai. Is liye har naye technician ko chahiye ke pehle safety seekhe, phir speed badhaye!


🎁 Bonus Tip – Tools Ki Maintenance Bhi Zaroori Hai!

Har 10 din baad apne tools ko:

πŸ”Ή Clean karein (especially soldering iron & multimeter probes)
πŸ”Ή Properly pack karein after use
πŸ”Ή Heat gun filters ko saaf karein
πŸ”Ή Broken wires ya tips ko turant replace karein
πŸ”Ή Soldering stand aur sponge use karein for tip cleaning

Tip: Tools ki safai aur protection se unki life double ho jati hai – aur aapka kaam bhi fast aur reliable hota hai.

Bonus Tip: Apne Tools Ki Lifespan Ko Kaise Barhayein? πŸ› οΈπŸ”‹

Agar aap chahte hain ke aapke repairing tools lambe arse tak kaam karein, to unki proper maintenance aur sahi jagah par storage bohot zaroori hai. Har tool ka apna ek specific use hota hai β€” unka overuse ya galat tarike se istemal na sirf unko damage karta hai, balkay aapke mobile repairing results ko bhi affect karta hai. Tools ko hamesha clean rakhain, moisture se door rakhein aur use ke baad proper case ya box mein wapas rakhain. Ek achhe technician ke paas sirf tools nahi, unka ilm aur zimmedari ka jazba bhi hota hai!


Mobile IC (Integrated Circuit) Ko Kaise Replace Karein? – Step by Step Guide

Meta Description:
Mobile IC replace kaise karein? Is guide mein janain mobile IC (Integrated Circuit) ki importance, uski replacement ka step-by-step process aur expert safety tips – sirf aaplusmobiles.com par!


πŸ” Mobile IC Kya Hoti Hai? Aur Kyun Zaroori Hai?

Mobile IC yaani Integrated Circuit, phone ke andar ek chhoti si chip hoti hai jo kisi specific function ko control karti hai. Har IC ka apna kaam hota hai, jaise:

  • Power IC – Battery aur power supply ko manage karta hai
  • Charging IC – Charging current ko regulate karta hai
  • Audio IC – Sound aur mic/speaker functions control karta hai
  • Network IC – SIM signals aur connectivity ka zimmedar hota hai
  • CPU / UEM / PMIC – Phone ka brain ya core circuits hote hain

Agar inmein se koi IC fail ho jaye, to mobile mein major issue aa sakta hai – jaise phone dead ho jana, charge na hona, network ka na aana, ya speaker/mic ka kaam na karna.


πŸ› οΈ Mobile IC Replacement Ka Step-by-Step Process

Step 1: Fault Diagnosis – Confirm Karen IC Hi Faulty Hai

Sabse pehle multimeter ya power supply se check karein:

  • Voltage drop ho raha ho
  • Heat aaraha ho IC se
  • Function (charge/sound/network) kaam na kar raha ho

πŸ‘¨β€πŸ”§ Pro Tip: Kabhi bhi bina proper diagnosis ke IC remove na karein.


Step 2: Required Tools Ready Karein

Achi IC replacement ke liye yeh tools hone chahiye:

  • Hot Air Rework Station
  • Soldering Iron
  • Flux Paste
  • Tweezer
  • Solder Wire
  • Microscope (recommended)
  • ESD Mat & Wrist Strap

Step 3: PCB Ko Safe Position Mein Fix Karein

PCB holder mein board ko fix karein. ESD protection ka khayal rakhna bohot zaroori hai.


Step 4: Heat Se Remove Karna

  • Hot air station ka temperature 300–350Β°C set karein
  • Nozzle ko thoda distance par rakhte hue heat apply karein
  • Jaise hi solder melt ho, IC ko tweezer se gently remove karein

⚠️ Caution: Zyada heat na dein warna adjacent components damage ho sakte hain


Step 5: Area Ko Clean Karna

Old solder ko remove kar ke area ko PCB cleaner aur flux se clean karein. Smooth surface ready karein new IC ke liye.


Step 6: New IC Lagana

  • New IC ko exact alignment ke sath place karein
  • Thoda flux lagayein
  • Heat gun se again gentle heating dein
  • Jaise hi solder melt ho, IC settle ho jata hai

πŸ’‘ Tip: Thoda press kar ke place karein taake evenly fix ho


Step 7: Final Cleaning & Testing

  • Area ko gently clean karein (alcohol + brush)
  • Multimeter se continuity check karein
  • PCB ko mobile body mein install karke phone on karein
  • Function test karein (charging, network, etc.)

πŸ§‘β€πŸ« FAQs – IC Replacement Se Pehle Ye Jaana Zaroori Hai

Q1: Har IC replace ho sakti hai?
πŸ‘‰ Nahi, kuch ICs like CPU ya PMIC BGA (Ball Grid Array) hoti hain jinke liye advanced tools aur experience chahiye.

Q2: IC Replacement ki cost kya hoti hai?
πŸ‘‰ IC type aur model pe depend karta hai. Common ICs like charging IC Rs. 300–700 tak cost karte hain.


🧯 Safety Tips

βœ… Hamesha ESD wrist band use karein
βœ… Overheat na karein
βœ… Sahi alignment zaroor ensure karein
βœ… Dummy board pe practice karein before real phone
βœ… Quality flux aur solder wire use karein


πŸ“‹ Summary

Mobile IC replacement ek technical aur precise kaam hai. Agar aap accurate diagnosis karein, sahi tools use karein aur safety protocols follow karein to aap kisi bhi faulty IC ko successfully replace kar sakte hain.

Chaahein aap beginner hoon ya expert, ye guide aapko professional technician banne ke liye help karegi.

πŸ”§ Aise aur expert-level guides ke liye visit karte rahiye:
πŸ“ aaplusmobiles.com – Learn Mobile Repairing, The Smart Way!


πŸ”Ž Focus Keywords:

  • Mobile IC replacement
  • How to change phone IC
  • Charging IC replacement guide
  • Power IC repair
  • Mobile circuit board repair