NAND Chip Programming in Mobile Repair

NAND Chip Programming in Mobile Repair

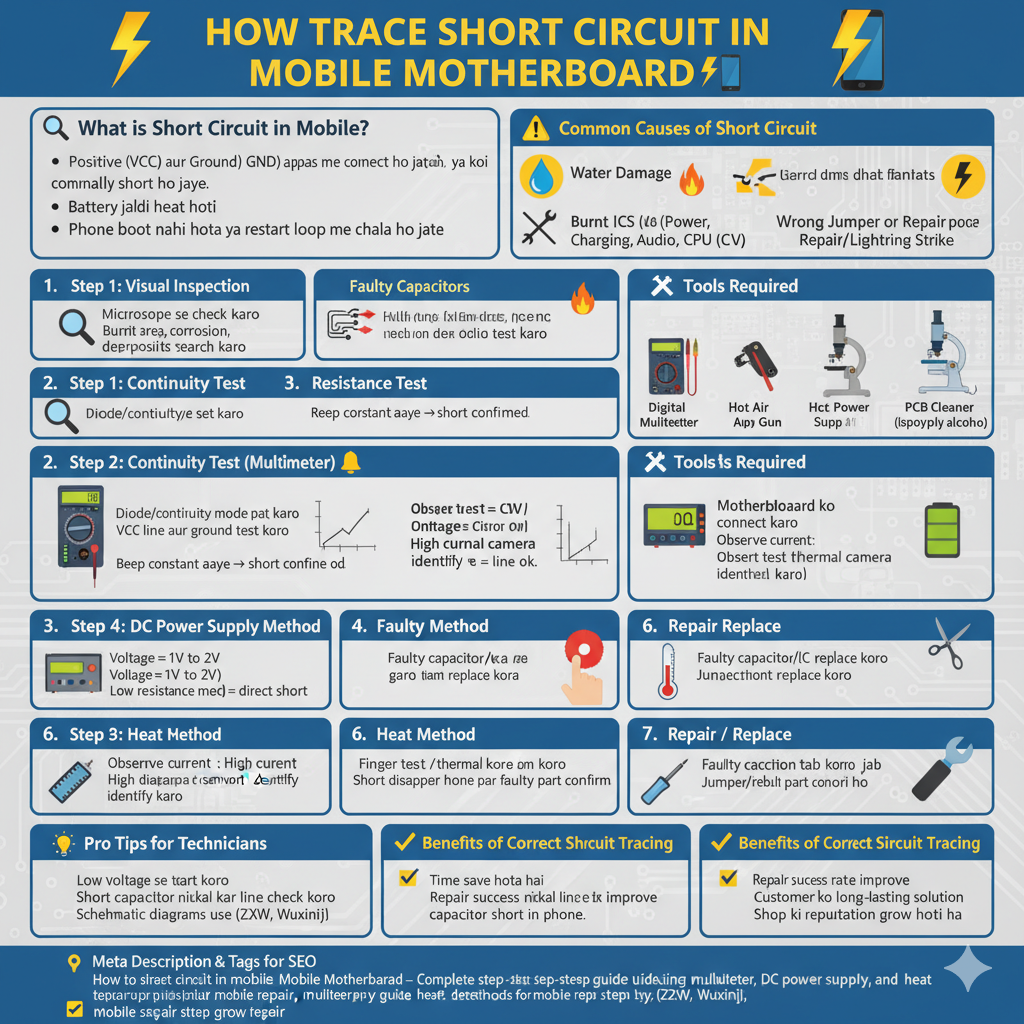
What is a NAND Chip?

NAND chip ek flash memory storage hoti hai jo mobile ke andar data store karti hai:

Operating System (Firmware)

IMEI / Security Data

User Data (Photos, Contacts, Apps)

Agar NAND corrupt ho jaye, mobile:

Boot loop me atak jata hai

Dead ho jata hai

Ya phir no storage detected error deta hai

Common Issues Related to NAND Chip

Corrupted Firmware / Data

Bad Sectors in NAND

Overheating or Physical Damage

Shorted NAND

Software Glitches after Update/Flashing

πŸ›  Tools Required for NAND Programming

NAND Programmer / eMMC Tool (UFI Box, Easy JTAG, Medusa Pro, etc.)

Hot Air Rework Station

Microscope

Soldering Kit (for BGA work)

Schematic Diagram / Pinout

Computer with Software Support

Step-by-Step NAND Programming Process

Step 1: Diagnosis

Check if mobile stuck on logo / no boot.

Try flashing via normal tools.

If flashing fails repeatedly β†’ NAND issue confirmed.

Step 2: Chip Removal (if required)

Use hot air station to carefully remove NAND chip from motherboard.

Protect nearby components with Kapton tape.

Step 3: Chip Connection

Place NAND chip in programmer socket or connect via test points.

Some tools support ISP (In-System Programming) β†’ no need to remove chip.

Step 4: Read & Backup

Use programmer software to read dump of old NAND.

Always keep backup of IMEI / security partitions.

Step 5: Erase & Reprogram

Erase bad data from NAND.

Write fresh firmware + security data.

Repair IMEI if required.

Step 6: Verification

After programming, verify written data.

Re-solder NAND back to motherboard (if removed).

Step 7: Testing

Power on mobile.

Check if device boots properly and storage is detected.

⚑ Pro Tips for Technicians

Always keep a full dump library for different models.

Avoid overheating NAND during removal β†’ it can get permanently damaged.

Use good quality flux for reballing/soldering.

ISP method is safer for beginners (no risk of chip damage).

NAND reprogramming is mostly required in Samsung, Oppo, Vivo, Xiaomi phones.

βœ… Benefits of NAND Programming

Revives dead phones

Fixes boot loop and storage errors

Saves customer’s data (if backup is possible)

Adds advanced-level income for technicians

Meta Description

NAND Chip Programming in Mobile Repair explained – Learn a step-by-step guide for diagnosing, removing, reprogramming, and repairing NAND flash in dead or boot loop phones.

Tags

nand chip programming, emmc repair, nand reprogramming mobile, dead phone repair, boot loop fix nand, mobile motherboard repair, ufi box nand, easy jtag nand repair

How to Trace Short Circuit in Mobile Motherboard

How to Trace Short Circuit in Mobile Motherboard

What is a short circuit in a mobile?

Short circuit tab hota hai jab positive (VCC) aur ground (GND) line aapas me connect ho jayein, ya koi component internally short ho jaye. Isse:

Mobile dead ho jata hai

Battery jaldi heat hoti hai

Phone boot nahi hota ya restart loop me chala jata hai

Common Causes of Short Circuit

Water Damage – Moisture se carbon deposit hota hai

Faulty Capacitors – SMD capacitors sabse zyada short hote hain

Burnt ICs – Power IC, Charging IC, Audio IC, CPU

Wrong Jumper or Repair Mistake

High Voltage Charger/Lightning Strike

πŸ›  Tools Required

Digital Multimeter

DC Power Supply

Hot Air Gun

Microscope (for small components)

PCB Cleaner (Isopropyl alcohol)

βš™οΈ Step-by-Step Method to Trace Short Circuit

Step 1: Visual Inspection πŸ‘€

Board ko microscope se check karo

Burnt area, corrosion, ya carbon deposits search karo

Step 2: Continuity Test (Multimeter) πŸ””

Multimeter ko diode/continuity mode par set karo

VCC line aur ground test karo

Agar beep constant aaye β†’ short confirmed

Step 3: Resistance Test πŸ“‰

Multimeter ko resistance mode par set karo

Low resistance (near 0Ξ©) means direct short

High resistance means line is ok

Step 4: DC Power Supply Method πŸ”‹

Motherboard ko DC Power Supply par connect karo

Voltage set = 1V to 2V (start low)

Current draw observe karo:

High current immediately = direct short

Finger test / thermal camera use karke heating component identify karo

Step 5: Heat Method 🌑️

Agar faulty capacitor/IC short hai β†’ woh jaldi garam hoga

Heat spot par component replace karo

Step 6: Isolation Method βœ‚οΈ

Shorted section trace karke components remove karo one by one

Short disappear hone par faulty part confirm ho jata hai

Step 7: Repair / Replace πŸ”§

Faulty capacitor/IC ko replace karo

Jumper ya reballing sirf tab karo jab zaroori ho

Pro Tips for Technicians

Hamesha low voltage se start karo jab DC Power Supply use kar rahe ho

Kapton tape use karke nearby components protect karo jab heat do

Agar short capacitor mil jaye β†’ usko nikal kar phir line check karo

Always cross-check with schematic diagrams (ZXW, Wuxinji)

βœ… Benefits of Correct Short Circuit Tracing

Time save hota hai

Repair success rate improve hoti hai

Customer ko long-lasting solution milta hai

Shop ki reputation grow hoti hai

Meta Description

How to Trace Short Circuit in Mobile Motherboard – Complete step-by-step guide using multimeter, DC power supply, and heat detection methods for mobile repair technicians.

Tags

short circuit in mobile, mobile motherboard repair, short tracing guide, dc power supply mobile repair, multimeter short test, capacitor short in phone, mobile repair step by step, dead phone repair

Mobile CPU Reballing – Complete Guide

Mobile CPU Reballing – Complete Guide

CPU reballing is the process of removing the mobile CPU (chip) from the motherboard, cleaning it, applying new solder balls, and reattaching it.

This is done when the CPU develops loose connections due to heat, pressure, or poor soldering.

⚠️ When is CPU Reballing Needed?

1. Mobile stuck on logo / boot loop

2. Auto restart or dead condition

3. Heating issue near CPU area

4. Touch / network / charging IC issues (sometimes related to CPU lines)

5. Previous repair attempts failed

πŸ›  Tools Required

Hot air rework station

BGA reballing kit (stencils + solder balls)

Flux paste

Microscope or magnifier

PCB holder

Cleaning brush + isopropyl alcohol

πŸ›  Step-by-Step Reballing Guide

Step 1: Preparation

Secure the motherboard in a PCB holder.

Apply flux around the CPU.

Step 2: CPU Removal

Heat with hot air rework station at controlled temperature (~350–400Β°C).

Gently lift CPU using a CPU picker once solder melts.

Step 3: Cleaning

Clean motherboard pads with solder wick + alcohol.

Remove old solder from CPU base.

Step 4: Reballing

Place CPU on stencil.

Apply solder paste or balls over stencil holes.

Heat gently until balls fix perfectly.

Step 5: Reinstallation

Align CPU with motherboard pads.

Heat carefully until it settles in place.

Let it cool β†’ Clean with alcohol.

⚑ Pro Tips

Always use original stencil size for CPU.

Avoid overheating β†’ May damage board or CPU.

Test board after reballing before final assembly.

Practice on scrap boards before working on customer devices.

How to Trace Short Circuit in Mobile Motherboard

How to Trace Short Circuit in Mobile Motherboard

πŸ” What is Short Circuit in Mobile?

Short circuit tab hota hai jab positive (VCC) aur ground (GND) line aapas me connect ho jayein, ya koi component internally short ho jaye. Isse:

Mobile dead ho jata hai

Battery jaldi heat hoti hai

Phone boot nahi hota ya restart loop me chala jata hai

⚠️ Common Causes of Short Circuit

Water Damage – Moisture se carbon deposit hota hai

Faulty Capacitors – SMD capacitors sabse zyada short hote hain

Burnt ICs – Power IC, Charging IC, Audio IC, CPU

Wrong Jumper or Repair Mistake

High Voltage Charger/Lightning Strike

πŸ›  Tools Required

Digital Multimeter

DC Power Supply

Hot Air Gun

Microscope (for small components)

PCB Cleaner (Isopropyl alcohol)

βš™οΈ Step-by-Step Method to Trace Short Circuit

Step 1: Visual Inspection πŸ‘€

Board ko microscope se check karo

Burnt area, corrosion, ya carbon deposits search karo

Step 2: Continuity Test (Multimeter) πŸ””

Multimeter ko diode/continuity mode par set karo

VCC line aur ground test karo

Agar beep constant aaye β†’ short confirmed

Step 3: Resistance Test πŸ“‰

Multimeter ko resistance mode par set karo

Low resistance (near 0Ξ©) means direct short

High resistance means line is ok

Step 4: DC Power Supply Method πŸ”‹

Motherboard ko DC Power Supply par connect karo

Voltage set = 1V to 2V (start low)

Current draw observe karo:

High current immediately = direct short

Finger test / thermal camera use karke heating component identify karo

Step 5: Heat Method 🌑️

Agar faulty capacitor/IC short hai β†’ woh jaldi garam hoga

Heat spot par component replace karo

Step 6: Isolation Method βœ‚οΈ

Shorted section trace karke components remove karo one by one

Short disappear hone par faulty part confirm ho jata hai

Step 7: Repair / Replace πŸ”§

Faulty capacitor/IC ko replace karo

Jumper ya reballing sirf tab karo jab zaroori ho

⚑ Pro Tips for Technicians

Hamesha low voltage se start karo jab DC Power Supply use kar rahe ho

Kapton tape use karke nearby components protect karo jab heat do

Agar short capacitor mil jaye β†’ usko nikal kar phir line check karo

Always cross-check with schematic diagrams (ZXW, Wuxinji)

βœ… Benefits of Correct Short Circuit Tracing

Time save hota hai

Repair success rate improve hoti hai

Customer ko long-lasting solution milta hai

Shop ki reputation grow hoti hai

πŸ“Œ Meta Description (SEO)

How to Trace Short Circuit in Mobile Motherboard – Complete step-by-step guide using multimeter, DC power supply, and heat detection methods for mobile repair technicians.

Mobile Repairing Mein SMD Rework Station Ka Use – Beginner to Pro Guide

Mobile Repairing Mein SMD Rework Station Ka Use – Beginner to Pro Guide
Agar aap mobile repairing field mein naye hain ya apni repairing skills ko next level par le jana chahte hain, to SMD Rework Station ka sahi istemal seekhna zaroori hai. Ye ek professional tool hai jo chip-level repairing mein backbone ki tarah kaam karta hai. Aaj ki guide mein hum step-by-step samjhayenge ke SMD Rework Station kya hota hai, kis liye use hota hai, aur beginner se expert banne tak ka safar kaise tay kiya jaye.


πŸ”§ What is an SMD Rework Station?

SMD Rework Station ek specialized repairing tool hai jo Surface Mount Devices (SMDs) ko remove aur re-solder karne ke liye use hota hai. Iska main part hot air gun hota hai, jo specific temperature par air blow karta hai to melt solder joints without damaging components.


πŸ› οΈ Key Components:

  1. Hot Air Gun: Adjustable temperature aur airflow ke sath aata hai.
  2. Soldering Iron: Precision soldering ke liye.
  3. Digital Display: Temperature aur airflow monitor karne ke liye.
  4. Nozzles: Alag-alag components ke liye custom airflow direction.

πŸ§‘β€πŸ« Beginner’s Guide – First Time Use

πŸ”Ή Step 1: Set Proper Temperature
Start with 280Β°C to 320Β°C for most mobile components.
(High temperature can burn PCB tracks!)

πŸ”Ή Step 2: Select Right Nozzle
Use small nozzle for ICs and larger one for shields.

πŸ”Ή Step 3: Apply Flux
Flux helps in heat distribution aur solder ko melt karne mein madad karta hai.

πŸ”Ή Step 4: Gently Remove SMD Component
Circular motion mein heat do, phir tweezers se lift karo.

πŸ”Ή Step 5: Clean Pad & Reball if Needed
Old solder ko wick se remove karo aur component dobara place karo.


🧠 Pro Tips for Experts:

βœ… PCB preheat zaroor karo for stable heat distribution
βœ… Har component ka melting point alag hota hai – hamesha datasheet refer karo
βœ… Kapton tape se nearby parts ko protect karo
βœ… Use magnifying lamp for precision


⚠️ Common Mistakes to Avoid:

🚫 Overheating – PCB damage ho sakta hai
🚫 No flux use – soldering uneven hogi
🚫 Wrong nozzle – airflow disperse ho jayega
🚫 Sudden temperature change – component crack ho sakta hai


πŸ“ˆ From Beginner to Pro

Start basic boards pe practice kar ke

YouTube aur professional training follow karo

Har component ka behavior samajhna seekho

Tools ki maintenance ka khayal rakho (nozzle clean, iron tip tinning)


🎯 Conclusion:

Agar aap seriously mobile motherboard repairing seekhna chahte hain, to SMD Rework Station ka sahi istemal master karna zaroori hai. Yeh tool aapko na sirf precision deta hai, balkay time-saving aur professional results bhi ensure karta hai.


SEO-Friendly Tags (Copy & Paste):
Mobile Repair Tools, SMD Rework Station Guide, Hot Air Gun Use, Mobile Motherboard Repair, Chip Level Repairing, SMD Station Tips, Mobile Repairing Tools in Urdu, Learn Mobile Repair