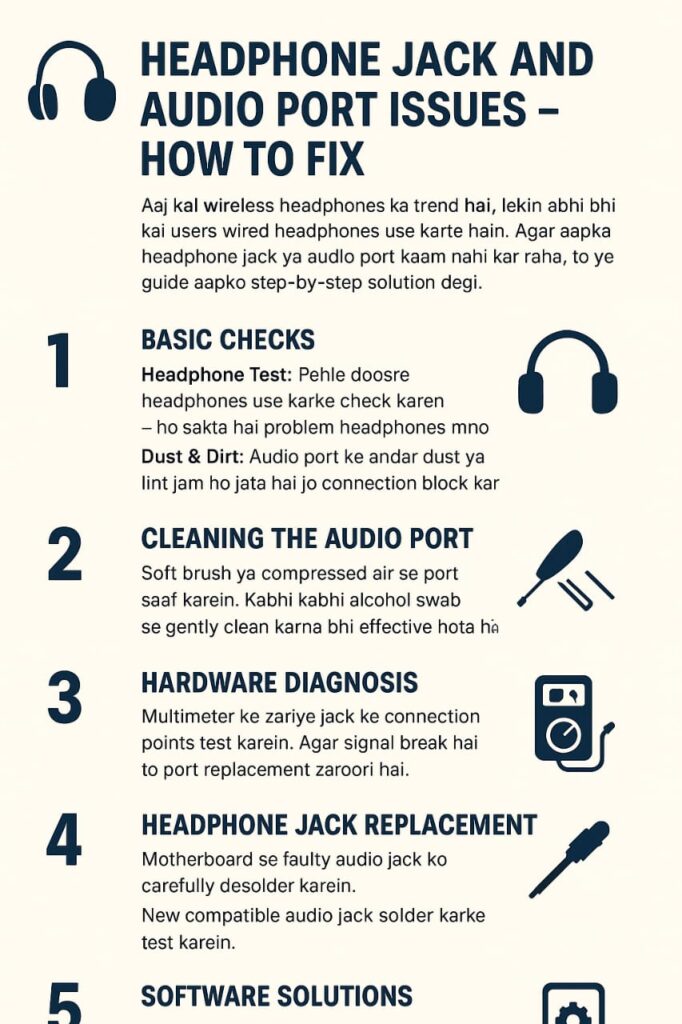
Aaj kal wireless headphones ka trend hai, lekin abhi bhi kai users wired headphones use karte hain. Agar aapka headphone jack ya audio port kaam nahi kar raha, to ye guide aapko step-by-step solution degi.
🔍 Step 1: Basic Checks
Headphone Test: Pehle doosre headphones use karke check karein – ho sakta hai problem headphones me ho.
Dust & Dirt: Audio port ke andar dust ya lint jam ho jata hai jo connection block karta hai.
Multimeter ke zariye jack ke connection points test karein.
Agar signal break hai to port replacement zaroori hai.
🔄 Step 4: Headphone Jack Replacement
Motherboard se faulty audio jack ko carefully desolder karein.
New compatible audio jack solder karke test karein.
💻 Step 5: Software Solutions
Phone restart karein aur safe mode me test karein.
Audio drivers/software bugs ki wajah se bhi sound issue aa sakta hai. Firmware update helpful ho sakta hai.
✅ Pro Tips for Technicians
Repair karte waqt magnifying glass ya microscope ka use karein.
Dummy headphone plug se port check karna easy hota hai.
Same like topics, Agar aap in keywords pr article prhna to ye kafi hai 😊
headphone jack not working fix, audio port repair guide, mobile headphone issue solution, headphone jack replacement, smartphone audio problems, phone sound not working repair
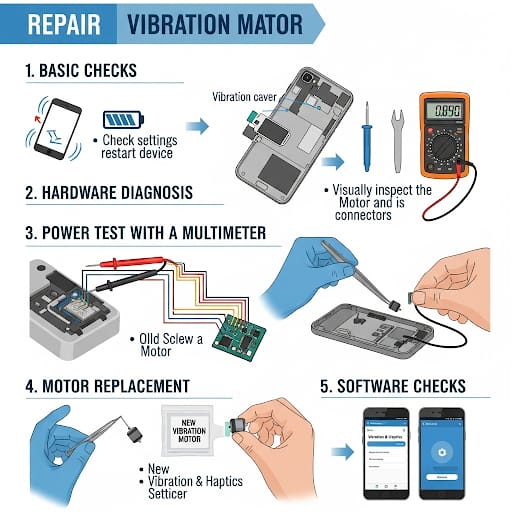
📱 Agar aapka mobile vibrate nahi kar raha, to problem chhoti lag sakti hai lekin iske peeche multiple reasons ho sakte hain. Is guide me hum step-by-step dekhenge ke vibration motor kaise diagnose aur repair ki jati hai.
🔍 Step 1: Basic Check Karein,
Settings Check: Pehle phone ke vibration settings on hain ya nahi, wo confirm karein.
Silent Mode: Dekhein phone silent mode me to nahi, kyun ke isme kuch phones vibration disable kar dete hain.
🛠 Step 2: Hardware Diagnosis
Back panel open karke vibration motor ki physical condition check karein.
Dust & Debris: Kabhi kabhi motor ke contacts par dust aa jata hai jo connection block kar deta hai.
⚡ Step 3: Power Test with Multimeter
Motor ke terminals par multimeter lagake voltage check karein.
Agar voltage aa raha hai lekin motor nahi chal rahi, to motor faulty hai.
🔄 Step 4: Motor Replacement
Faulty motor ko carefully desolder karein.
Nayi compatible motor install karein aur solder joints strong rakhein.
💡 Step 5: Software Check
Kabhi kabhi software bugs ki wajah se bhi vibration kaam nahi karta.
Factory reset ya firmware update karke check karein.
✅ Tip: Har model ka motor shape aur size alag hota hai, isliye replacement se pehle part match karna zaroori hai.
📌 Ready-to-Paste SEO Tags:
mobile vibration motor repair, phone not vibrating fix, mobile vibration issue solution, vibration motor replacement, smartphone vibration problem, phone repair guide, vibration motor not working
📱 Agar aapka mobile vibrate nahi kar raha, to problem chhoti lag sakti hai lekin iske peeche multiple reasons ho sakte hain. Is guide me hum step-by-step dekhenge ke vibration motor kaise diagnose aur repair ki jati hai.
🔍 Step 1: Basic Check Karein
Settings Check: Pehle phone ke vibration settings on hain ya nahi, wo confirm karein.
Silent Mode: Dekhein phone silent mode me to nahi, kyun ke isme kuch phones vibration disable kar dete hain.
🛠 Step 2: Hardware Diagnosis
Back panel open karke vibration motor ki physical condition check karein.
Dust & Debris: Kabhi kabhi motor ke contacts par dust aa jata hai jo connection block kar deta hai.
⚡ Step 3: Power Test with Multimeter
Motor ke terminals par multimeter lagake voltage check karein.
Agar voltage aa raha hai lekin motor nahi chal rahi, to motor faulty hai.
🔄 Step 4: Motor Replacement
Faulty motor ko carefully desolder karein.
Nayi compatible motor install karein aur solder joints strong rakhein.
💡 Step 5: Software Check
Kabhi kabhi software bugs ki wajah se bhi vibration kaam nahi karta.
Factory reset ya firmware update karke check karein.
✅ Tip: Har model ka motor shape aur size alag hota hai, isliye replacement se pehle part match karna zaroori hai.
📌 Ready-to-Paste SEO Tags:
Mobile Vibration Motor Not Working – Repair Guide 📱 Agar aapka mobile vibrate nahi kar raha, to problem chhoti lag sakti hai lekin iske peeche multiple reasons ho sakte hain. Is guide me hum step-by-step dekhenge ke vibration motor kaise diagnose aur repair ki jati hai.
🔍 Step 1: Basic Check Karein Settings Check: Pehle phone ke vibration settings on hain ya nahi, wo confirm karein. Silent Mode: Dekhein phone silent mode me to nahi, kyun ke isme kuch phones vibration disable kar dete hain.
🛠 Step 2: Hardware Diagnosis Back panel open karke vibration motor ki physical condition check karein. Dust & Debris: Kabhi kabhi motor ke contacts par dust aa jata hai jo connection block kar deta hai.
⚡ Step 3: Power Test with Multimeter Motor ke terminals par multimeter lagake voltage check karein. Agar voltage aa raha hai lekin motor nahi chal rahi, to motor faulty hai.
🔄 Step 4: Motor Replacement Faulty motor ko carefully desolder karein. Nayi compatible motor install karein aur solder joints strong rakhein.
💡 Step 5: Software Check Kabhi kabhi software bugs ki wajah se bhi vibration kaam nahi karta. Factory reset ya firmware update karke check karein.
✅ Tip: Har model ka motor shape aur size alag hota hai, isliye replacement se pehle part match karna zaroori hai.
📌 Ready-to-Paste SEO Tags: mobile vibration motor repair, phone not vibrating fix, mobile vibration issue solution, vibration motor replacement, smartphone vibration problem, phone repair guide, vibration motor not working
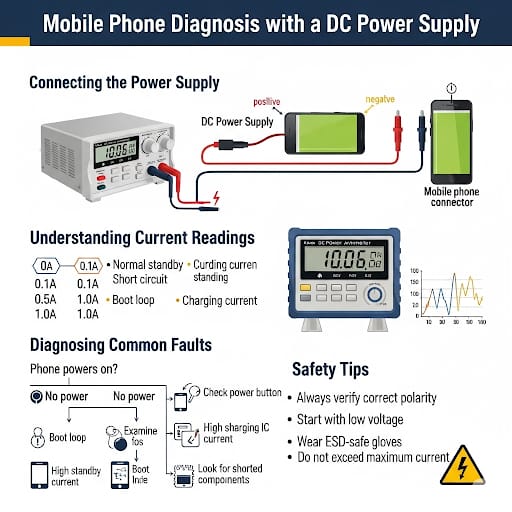
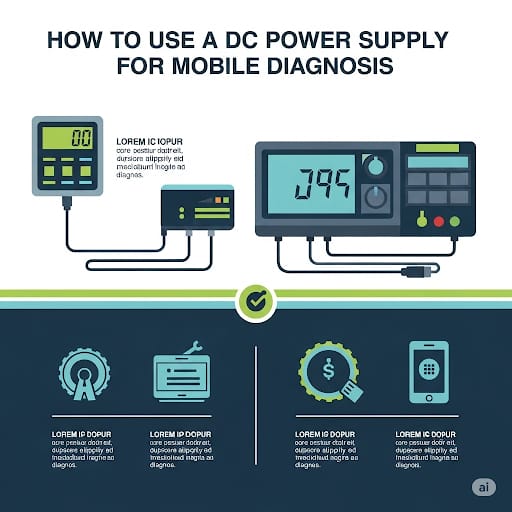
DC Power Supply mobile repairing ka ek bohot important tool hai, jo aapko mobile ke power consumption aur faults ka pata lagane me madad deta hai. Is ka sahi istemal diagnose process ko fast aur accurate banata hai. Aayiye step-by-step samajhte hain:
1️⃣ DC Power Supply ka Purpose Samajhna
Mobile phone battery ki jagah DC power supply connect karke aap phone ki current reading dekh sakte hain. Is se pata chalta hai ke phone short hai, on ho raha hai ya kisi stage pe stuck hai.
DC power supply ka red wire positive aur black wire negative terminal me connect karein.
Voltage 4.2V set karein (mobile battery ke standard ke mutabiq).
3️⃣ Current Reading Samajhna
0 Amp: Phone me koi activity nahi, ya connection galat hai.
0.02–0.05 Amp: Standby mode me phone.
0.3–0.5 Amp: Phone boot ho raha hai.
High Amp (1A ya zyada): Short circuit ya heavy load issue.
4️⃣ Fault Diagnosis Examples
Agar phone on nahi hota aur current direct high chala jata hai → short circuit.
Agar phone boot me stuck ho aur current fluctuate ho → software ya hardware fault.
5️⃣ Safety Tips
Voltage hamesha mobile battery ke standard ke mutabiq rakhein.
Probes galat polarity me na lagayen.
Power supply ka sudden high voltage phone ko damage kar sakta hai.
Conclusion: DC power supply mobile diagnosis ka ek must-have tool hai jo aapko short detection, boot issues aur faulty components identify karne me bohot madad karta hai. Agar aap ise sahi tariqe se use karna seekh lein to repairing ka accuracy level kaafi improve ho jata hai.
Iski infographic bna dy
Proximity Sensor Repair, Mobile Proximity Sensor Not Working, Proximity Sensor Causes and Fix, Smartphone Sensor Repair Guide, Android Proximity Sensor Solution, iPhone Proximity Sensor Issue, Mobile Sensor Problem Repair, Mobile Repairing Tips, Sensor Replacement Guide, Mobile Repair Blog
DC Power Supply mobile repairing ka ek bohot important tool hai, jo aapko mobile ke power consumption aur faults ka pata lagane me madad deta hai. Is ka sahi istemal diagnose process ko fast aur accurate banata hai. Aayiye step-by-step samajhte hain:
1️⃣ DC Power Supply ka Purpose Samajhna
Mobile phone battery ki jagah DC power supply connect karke aap phone ki current reading dekh sakte hain. Is se pata chalta hai ke phone short hai, on ho raha hai ya kisi stage pe stuck hai.
DC power supply ka red wire positive aur black wire negative terminal me connect karein.
Voltage 4.2V set karein (mobile battery ke standard ke mutabiq).
3️⃣ Current Reading Samajhna
0 Amp: Phone me koi activity nahi, ya connection galat hai.
0.02–0.05 Amp: Standby mode me phone.
0.3–0.5 Amp: Phone boot ho raha hai.
High Amp (1A ya zyada): Short circuit ya heavy load issue.
4️⃣ Fault Diagnosis Examples
Agar phone on nahi hota aur current direct high chala jata hai → short circuit.
Agar phone boot me stuck ho aur current fluctuate ho → software ya hardware fault.
5️⃣ Safety Tips
Voltage hamesha mobile battery ke standard ke mutabiq rakhein.
Probes galat polarity me na lagayen.
Power supply ka sudden high voltage phone ko damage kar sakta hai.
Conclusion: DC power supply mobile diagnosis ka ek must-have tool hai jo aapko short detection, boot issues aur faulty components identify karne me bohot madad karta hai. Agar aap ise sahi tariqe se use karna seekh lein to repairing ka accuracy level kaafi improve ho jata hai.
DC power supply for mobile repairing, how to use DC power supply for mobile diagnosis, mobile repairing tools, mobile diagnosis using DC power supply, DC power supply tutorial, mobile short circuit detection, mobile boot issue diagnosis, mobile repairing tips, mobile repairing step by step, mobile repairing training, DC power supply current reading, mobile repairing guide in urdu, phone repairing ka tariqa, mobile hardware repairing, DC power supply ka use, mobile current reading guide, mobile repair troubleshooting, DC voltage setting for mobile repair, mobile repair course in urdu, electronics repair tools
DC Power Supply mobile repairing ka ek bohot important tool hai, jo aapko mobile ke power consumption aur faults ka pata lagane me madad deta hai. Is ka sahi istemal diagnose process ko fast aur accurate banata hai. Aayiye step-by-step samajhte hain:
1️⃣ DC Power Supply ka Purpose Samajhna
Mobile phone battery ki jagah DC power supply connect karke aap phone ki current reading dekh sakte hain. Is se pata chalta hai ke phone short hai, on ho raha hai ya kisi stage pe stuck hai.
DC power supply ka red wire positive aur black wire negative terminal me connect karein.
Voltage 4.2V set karein (mobile battery ke standard ke mutabiq).
3️⃣ Current Reading Samajhna
0 Amp: Phone me koi activity nahi, ya connection galat hai.
0.02–0.05 Amp: Standby mode me phone.
0.3–0.5 Amp: Phone boot ho raha hai.
High Amp (1A ya zyada): Short circuit ya heavy load issue.
4️⃣ Fault Diagnosis Examples
Agar phone on nahi hota aur current direct high chala jata hai → short circuit.
Agar phone boot me stuck ho aur current fluctuate ho → software ya hardware fault.
5️⃣ Safety Tips
Voltage hamesha mobile battery ke standard ke mutabiq rakhein.
Probes galat polarity me na lagayen.
Power supply ka sudden high voltage phone ko damage kar sakta hai.
Conclusion: DC power supply mobile diagnosis ka ek must-have tool hai jo aapko short detection, boot issues aur faulty components identify karne me bohot madad karta hai. Agar aap ise sahi tariqe se use karna seekh lein to repairing ka accuracy level kaafi improve ho jata hai.
DC power supply for mobile repairing, mobile repairing tools, mobile diagnosis using DC power supply, DC power supply tutorial, how to use DC power supply for phone, mobile short circuit detection, mobile boot issue diagnosis, mobile repairing tips, mobile repairing step by step, mobile repairing training, DC power supply current reading, mobile repairing guide in urdu, phone repairing ka tariqa, mobile hardware repairing, DC power supply ka use
Mobile repairing ki duniya me, jab PCB (Printed Circuit Board) ke tracks damage ho jate hain, to phone ka kaam ruk jata hai. Yeh damage aksar short circuit, overheating, corrosion, ya physical damage ki wajah se hota hai. Aise cases me “Jumper Solutions” ek advanced repairing technique hai jo device ko dobara functional banane me help karti hai.
🔍 Jumper Solution Kya Hai?
Jumper lagana ka matlab hai ek naya electrical path banana taake damaged ya cut track ko bypass kiya ja sake. Isme ek patli copper wire ya conductive material use hota hai jo signal ko original point se destination point tak le jata hai.
⚙️ Advanced Jumper Solutions Ki Zarurat Kab Padti Hai?
📌 Burnt PCB Tracks – Overcurrent ya short circuit ki wajah se tracks jal jana.
📌 Corrosion Damage – Pani girne ya moisture se copper track ghul jana.
📌 Physical Damage – Girne ya todne se track break ho jana.
📌 Manufacturing Faults – Rare cases me PCB design issue.
Jumper Wire Select Karna – AWG size aur flexibility ko dhyan me rakhna.
Precision Soldering – Jumper ko dono points pe securely solder karna.
Testing – Multimeter se continuity check karna.
Insulation & Protection – UV mask ya kapton tape se secure karna.
🎯 Tips for Advanced Jumper Repair
✅ Hamesha schematic diagram ka use karein.
✅ Shortest and clean path choose karein.
✅ Jumper wire ko unnecessary bends na dein.
✅ Proper insulation lagana na bhoolen.
📌 Conclusion
Advanced jumper solutions ek aisi skill hai jo sirf professional mobile repair technicians ko perfectly aati hai. Ye technique na sirf phone ko revive karti hai balki PCB ki life bhi badhati hai. Agar aap professional level pe repair karna chahte hain to jumper solution mastering aapke liye must-have skill hai.
advanced jumper solutions, PCB track repair, mobile repairing jumper technique, how to repair damaged PCB tracks, jumper wire soldering, PCB jumper tutorial, mobile PCB repair tips, repairing burnt PCB tracks, mobile repairing advanced tips, jumper solution step by step, PCB corrosion repair, mobile hardware repairing, mobile repairing training, mobile repairing ka tariqa, PCB jumper wire guide
📱 Agar aapka mobile vibrate nahi kar raha, to problem chhoti lag sakti hai lekin iske peeche multiple reasons ho sakte hain. Is guide me hum step-by-step dekhenge ke vibration motor kaise diagnose aur repair ki jati hai.
🔍 Step 1: Basic Check Karein
Settings Check: Pehle phone ke vibration settings on hain ya nahi, wo confirm karein.
Silent Mode: Dekhein phone silent mode me to nahi, kyun ke isme kuch phones vibration disable kar dete hain.
🛠 Step 2: Hardware Diagnosis
Back panel open karke vibration motor ki physical condition check karein.
Dust & Debris: Kabhi kabhi motor ke contacts par dust aa jata hai jo connection block kar deta hai.
⚡ Step 3: Power Test with Multimeter
Motor ke terminals par multimeter lagake voltage check karein.
Agar voltage aa raha hai lekin motor nahi chal rahi, to motor faulty hai.
🔄 Step 4: Motor Replacement
Faulty motor ko carefully desolder karein.
Nayi compatible motor install karein aur solder joints strong rakhein.
💡 Step 5: Software Check
Kabhi kabhi software bugs ki wajah se bhi vibration kaam nahi karta.
Factory reset ya firmware update karke check karein.
✅ Tip: Har model ka motor shape aur size alag hota hai, isliye replacement se pehle part match karna zaroori hai.
📌 Ready-to-Paste SEO Tags:
mobile vibration motor repair, phone not vibrating fix, mobile vibration issue solution, vibration motor replacement, smartphone vibration problem, phone repair guide, vibration motor not working
Mobile Vibration Motor Not Working – Repair Guide
📱 Agar aapka mobile vibrate nahi kar raha, to problem chhoti lag sakti hai lekin iske peeche multiple reasons ho sakte hain. Is guide me hum step-by-step dekhenge ke vibration motor kaise diagnose aur repair ki jati hai.
🔍 Step 1: Basic Check Karein
Settings Check: Pehle phone ke vibration settings on hain ya nahi, wo confirm karein.
Silent Mode: Dekhein phone silent mode me to nahi, kyun ke isme kuch phones vibration disable kar dete hain.
🛠 Step 2: Hardware Diagnosis
Back panel open karke vibration motor ki physical condition check karein.
Dust & Debris: Kabhi kabhi motor ke contacts par dust aa jata hai jo connection block kar deta hai.
⚡ Step 3: Power Test with Multimeter
Motor ke terminals par multimeter lagake voltage check karein.
Agar voltage aa raha hai lekin motor nahi chal rahi, to motor faulty hai.
🔄 Step 4: Motor Replacement
Faulty motor ko carefully desolder karein.
Nayi compatible motor install karein aur solder joints strong rakhein.
💡 Step 5: Software Check
Kabhi kabhi software bugs ki wajah se bhi vibration kaam nahi karta.
Factory reset ya firmware update karke check karein.
✅ Tip: Har model ka motor shape aur size alag hota hai, isliye replacement se pehle part match karna zaroori hai.
📌 Ready-to-Paste SEO Tags:
mobile vibration motor repair, phone not vibrating fix, mobile vibration issue solution, vibration motor replacement, smartphone vibration problem, phone repair guide, vibration motor not working
DC Power Supply mobile repairing ka ek bohot important tool hai, jo aapko mobile ke power consumption aur faults ka pata lagane me madad deta hai. Is ka sahi istemal diagnose process ko fast aur accurate banata hai. Aayiye step-by-step samajhte hain:
1️⃣ DC Power Supply ka Purpose Samajhna
Mobile phone battery ki jagah DC power supply connect karke aap phone ki current reading dekh sakte hain. Is se pata chalta hai ke phone short hai, on ho raha hai ya kisi stage pe stuck hai.
DC power supply ka red wire positive aur black wire negative terminal me connect karein.
Voltage 4.2V set karein (mobile battery ke standard ke mutabiq).
3️⃣ Current Reading Samajhna
0 Amp: Phone me koi activity nahi, ya connection galat hai.
0.02–0.05 Amp: Standby mode me phone.
0.3–0.5 Amp: Phone boot ho raha hai.
High Amp (1A ya zyada): Short circuit ya heavy load issue.
4️⃣ Fault Diagnosis Examples
Agar phone on nahi hota aur current direct high chala jata hai → short circuit.
Agar phone boot me stuck ho aur current fluctuate ho → software ya hardware fault.
5️⃣ Safety Tips
Voltage hamesha mobile battery ke standard ke mutabiq rakhein.
Probes galat polarity me na lagayen.
Power supply ka sudden high voltage phone ko damage kar sakta hai.
Conclusion: DC power supply mobile diagnosis ka ek must-have tool hai jo aapko short detection, boot issues aur faulty components identify karne me bohot madad karta hai. Agar aap ise sahi tariqe se use karna seekh lein to repairing ka accuracy level kaafi improve ho jata hai.
DC power supply for mobile repairing, mobile repairing tools, mobile diagnosis using DC power supply, DC power supply tutorial, how to use DC power supply for phone, mobile short circuit detection, mobile boot issue diagnosis, mobile repairing tips, mobile repairing step by step, mobile repairing training, DC power supply current reading, mobile repairing guide in urdu, phone repairing ka tariqa, mobile hardware repairing, DC power supply ka use
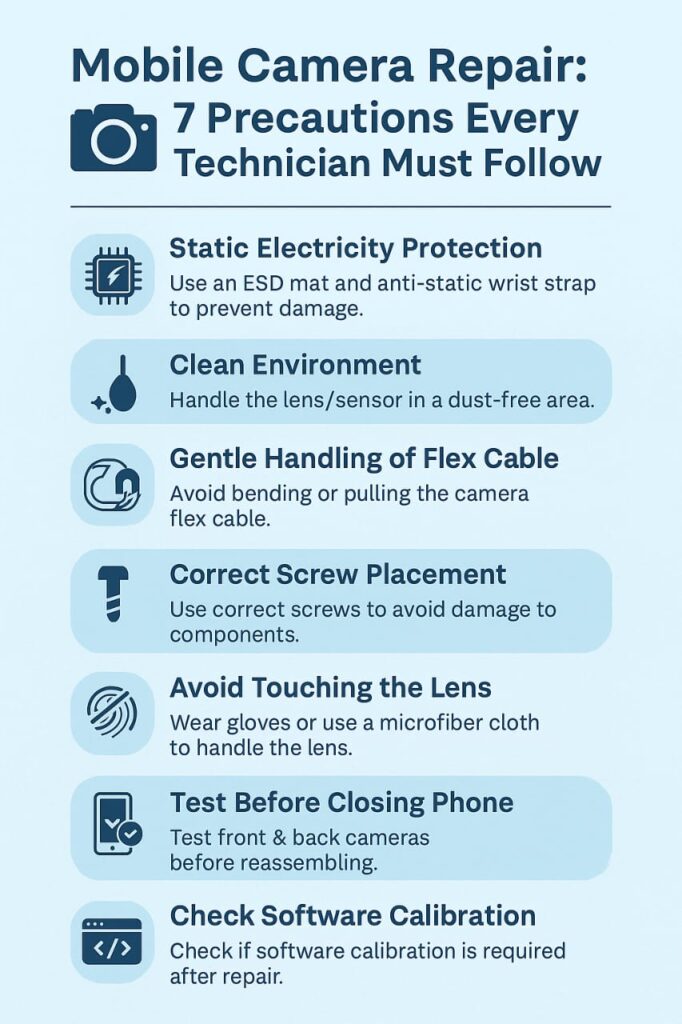
Camera Issues Fixing Precautions Every Mobile Technician Must Follow
Aaj kal har mobile phone ka sabse zyada use hone wala feature camera 📷 hai. Log apne mobile ka camera selfie 🤳, video recording 🎥, aur social media ke liye use karte hain. Lekin jab camera issues aate hain, to customer ka patience test hota hai 😅. Ek mobile repairing technician ke liye yeh kaam bohot delicately karna padta hai, warna thoda sa galat step camera ko permanently damage kar sakta hai 🚫.
Yahan main aapko camera repair ke waqt ki zaroori ihtiyaat bata raha hoon jo har technician ko follow karni chahiye
Meta Description
Learn the essential precautions mobile repair technicians must follow while fixing camera issues. Avoid damage, ensure quality repairs, and keep customers happy.
Camera Issues Solve Karne Ke Dauran Kya Kya Ehtiyaat Karni Chahiye
Mobile repairing ka kaam accuracy aur safety ka demand karta hai — especially jab baat camera issues ki ho. Aaj hum baat karenge un important precautions ki jo har technician ko follow karni chahiye, taake repair ka result best aaye aur phone ki quality safe rahe.
1️⃣ Static Electricity Se Bachao
📍 Precaution: Repairing ke waqt ESD mat aur anti-static wrist strap ka use karein. ⚠ Kyun? Static electricity easily camera module ko damage kar sakti hai.
2️⃣ Clean & Dust-Free Environment
📍 Precaution: Camera lens ya sensor handle karte waqt hamesha dust-free environment mein kaam karein. 🧹 Kyun? Thoda sa dust particle bhi image quality ko blur kar sakta hai.
3️⃣ Gentle Handling of Flex Cable
📍 Precaution: Camera module ke flex cable ko zyada bend ya pull na karein. 💡 Kyun? Flex cable easily damage hota hai aur phir camera detect hi nahi hota.
4️⃣ Correct Screw Placement
📍 Precaution: Har screw ko uski correct position par lagayein. 🔩 Kyun? Galat screw use karne se motherboard ya camera bracket damage ho sakta hai.
5️⃣ Avoid Direct Finger Touch on Lens
📍 Precaution: Camera lens ko hamesha gloves pehn kar ya microfiber cloth ke saath handle karein. 🛑 Kyun? Fingerprints permanent smudges chhod dete hain jo easily clean nahi hote.
6️⃣ Proper Testing Before Closing the Phone
📍 Precaution: Repair ke baad phone ko complete assemble karne se pehle camera test karein (front & back dono). ✅ Kyun? Baad mein dobara kholne ka risk aur time waste bach jaata hai.
7️⃣ Software Calibration Check
📍 Precaution: Agar camera change ho raha hai to software calibration ka option zarur check karein. 💻 Kyun? Kuch phones (specially iPhones) mein calibration ke bina quality low hoti hai.
💡 Pro Tip: Hamesha customer ko repair ke baad short demo dikhayein taake unka trust aur satisfaction barhe.
📌 Tags (SEO Ready)
mobile camera repair tips, precautions in mobile repairing, camera module replacement safety, mobile repair guide, camera fixing precautions, mobile repairing tips, safe phone repair
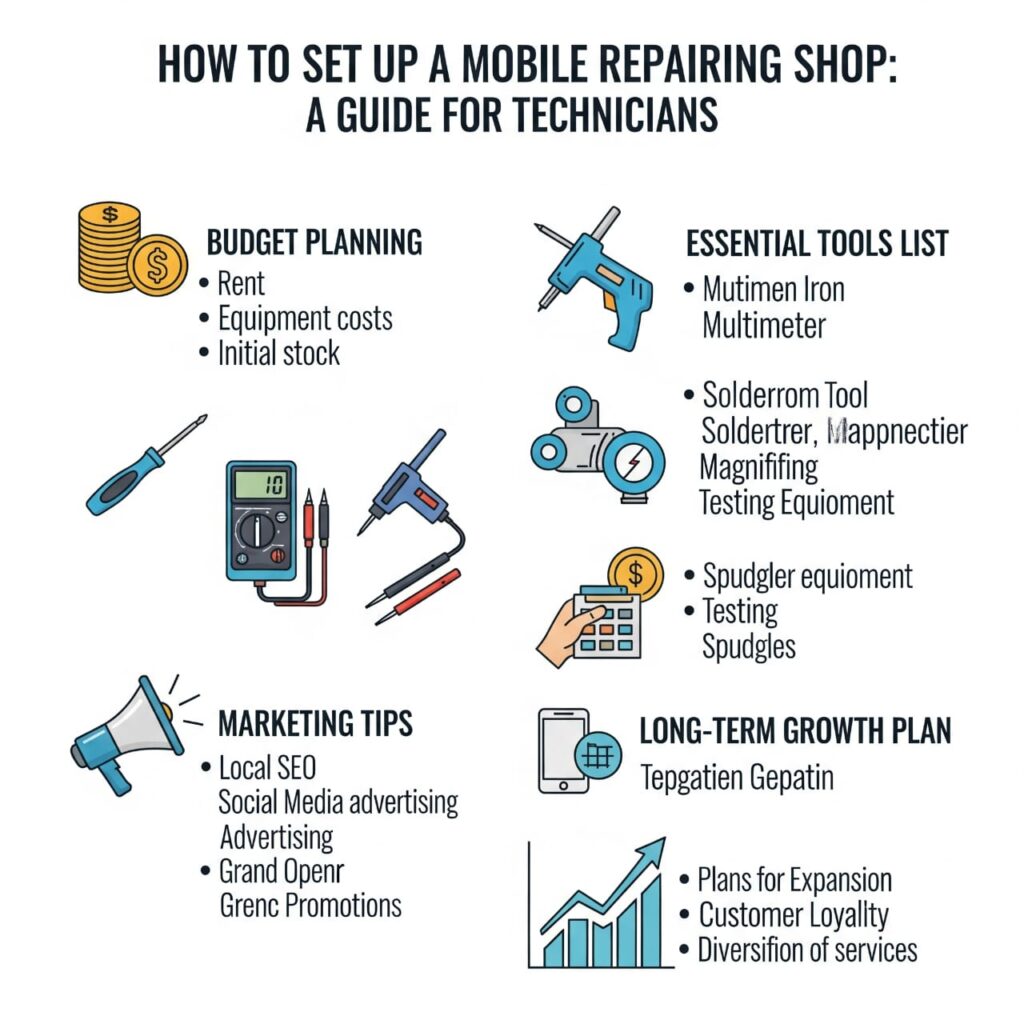
Introduction: How to Set Up a Mobile Repairing Shop – Budget Tools and Marketing Tips Mobile repairing ka business aaj ke zamane mein ek high-demand aur low-investment opportunity hai. Lekin agar aap properly plan kar ke shop setup nahi karte, toh profit milna mushkil ho sakta hai. Is guide mein hum baat karenge: ✅ Budget kitna chahiye ✅ Kaunse essential tools zaroori hain ✅ Aur kaise marketing karke customers attract kiye ja sakte hain — chahe aap beginner ho ya experienced technician!
💰 1. Initial Budget Planning – Minimum to Pro Setup
Aapka budget depend karta hai aap kis level ki shop open karna chahte hain:
Location: Market ya crowded area mein ho jahan mobile shops hon
Shop Size: 10×10 ft minimum
Interior:
Counter + Seating area
Display for accessories
Tool bench with proper lighting
CCTV for security
📢 4. Marketing Tips – Get Customers Fast
Google My Business pe listing banayein
Facebook/Instagram par repair videos ya before-after posts share karein
WhatsApp status mein daily offers lagayein
Local pamphlet/visiting card banayein
Nearby shops ko commission offer karein agar woh aapke paas customer bhejein
Google Ads ya Meta Ads se targeting karein
Customers ka feedback collect karke reviews post karein
🤖 5. Long-Term Growth Plan
Online appointment system introduce karein
Chip-level repairing seekhein
Mobile accessories & prepaid sim sales add karein
Mini YouTube channel ya blog start karein – apna brand banayein
✅ Conclusion:
Ek successful mobile repairing shop banane ke liye sirf tools nahi, smart planning, professional attitude, aur consistent marketing bhi zaroori hai. Chahe aap Rs. 1 lakh se start kar rahe ho ya Rs. 5 lakh se — aapka dedication aur service quality hi game change karegi!
📌 Meta Description
Start your own mobile repairing shop in Pakistan with this expert guide. Learn tools, budget, setup, and marketing tips to grow your mobile repair business fast.