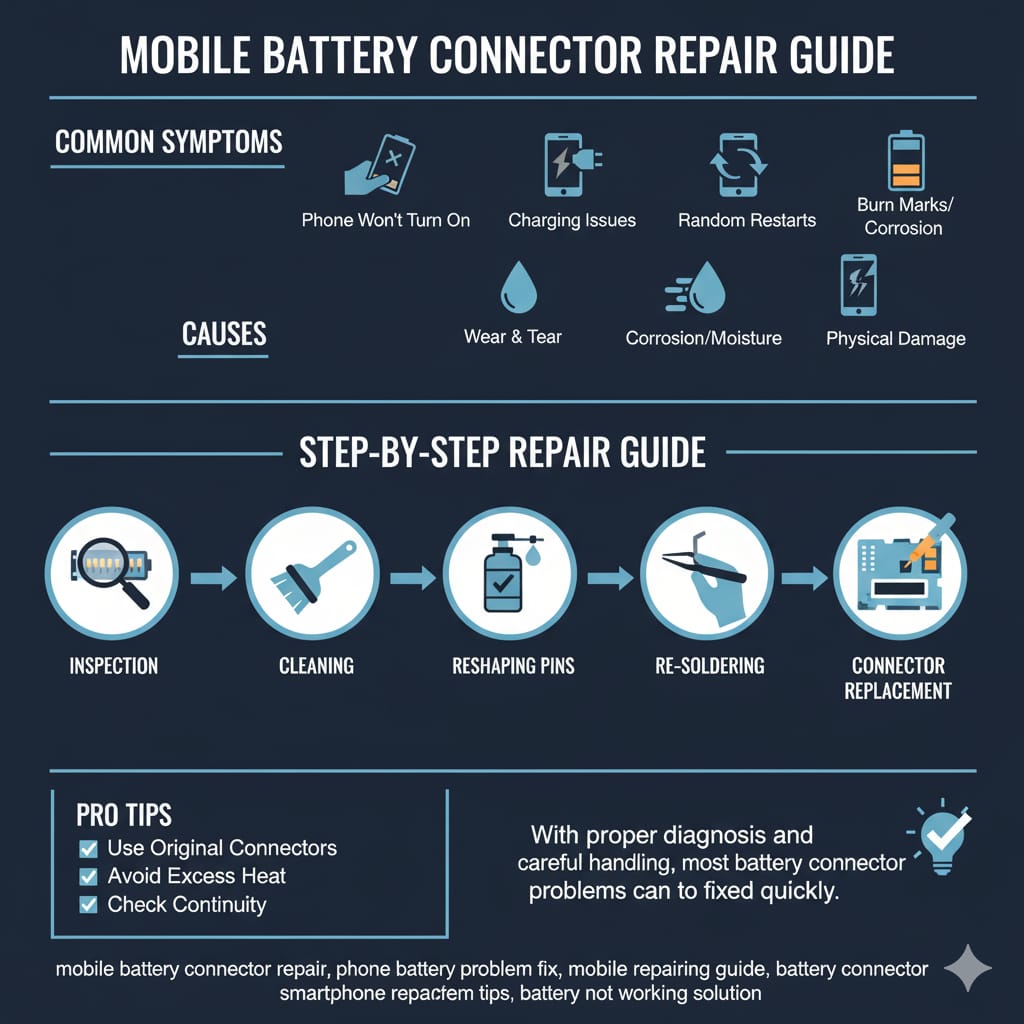
A faulty battery connector can cause mobile phones to randomly power off, fail to charge, or show unstable performance. Understanding how to diagnose and repair this issue is an essential skill for every mobile technician.
🔎 Common Symptoms of a Faulty Battery Connector
Phone not powering on even with a good battery
Charging issues or loose charging connection
Phone restarts randomly when shaken or moved
Burn marks or corrosion near battery terminal
⚠️ Causes of Battery Connector Problems
Wear and Tear – Frequent battery removal damages pins.
Corrosion – Moisture exposure leads to rust or oxidation.
Physical Damage – Dropping or mishandling the phone.
Overheating – High current flow causes connector melting.
🛠️ Step-by-Step Repair Guide
Inspection 🔍
Open the back cover and check the connector pins under a microscope.
Cleaning 🧹
Use isopropyl alcohol and a brush to remove dirt or corrosion.
Reshaping Pins 🔧
If pins are bent, gently reshape with tweezers.
Re-Soldering 🔥
For loose connectors, re-solder the joints carefully.
Connector Replacement 🆕
If pins are broken or melted, replace the connector with a new one.
🌟 Pro Tips
Always use original replacement connectors.
Avoid excess heat during soldering to prevent board damage.
Check continuity with a multimeter after repair.
✅ With proper diagnosis and careful handling, most battery connector problems can be fixed quickly, restoring the phone’s normal functionality.
Topics About Mobile Battery Connector Repair Guide
mobile battery connector repair, phone battery problem fix, mobile repairing guide, battery connector replacement, smartphone repair tips, battery not working solution
Smartphones mein Auto Brightness ka Masla Kaise Theek Karein
Auto brightness ek zabardast feature hai jo mahaul ki roshni ke hisaab se screen ki light ko khudkar tareeqay se adjust karta hai. Lekin aksar aisa hota hai ke yeh feature sahih tareeqay se kaam nahi karta – kabhi screen bohot madham rehti hai, kabhi zaroorat se zyada bright ho jati hai. Aaiye dekhte hain ke is masle ki wajuhaat kya hain aur isay kaise hal kiya ja sakta hai.
Struggling with smartphone auto brightness? Learn quick fixes for common issues like blocked sensors and software bugs. Get your screen brightness working perfectly again!”
Auto Brightness Masail ki Aam Wajuhaat
Ambient Light Sensor Blocked – Agar sensor par dhool, screen protector ya cover hai toh woh sahih roshni nahi pakadta.
Software Bug – Kisi update ya bug ki wajah se auto brightness sahih response nahi deta.
Hardware Issue – Sensor kharab ya damage ho sakta hai.
Settings Misconfiguration – Brightness ya Adaptive Display ke options ghalat set ho sakte hain.
Qadam Ba Qadam Hal
Sensor Area Ko Saaf Karein
Phone ke oopar wale hisse ko saaf karein.
Agar aap ne mota screen protector ya case lagaya hai toh usay hata kar check karein.
Smartphone Ko Restart Karein
Ek saada restart aksar chote bugs khatam kar deta hai.
Auto Brightness Settings Check Karein
Settings → Display → Auto/Adaptive Brightness mein jaa kar isay off aur on karein.
Software Update Karein
Phone ke System Updates check karein.
Aksar companies bugs ko update mein fix karti hain.
Safe Mode Mein Check Karein
Phone ko Safe Mode mein on karein taake pata chal sake ke koi third party app masla kar rahi hai ya nahi.
Sensor Ko Calibrate Karein
Kuch mobiles mein Hidden Codes ya Service Menu ke zariye sensor ko re-calibrate kiya ja sakta hai.
Factory Reset (Aakhri Option)
Agar kuch kaam na kare toh data backup karke factory reset karein.
Kab Technician Ke Paas Jaein?
Agar oopar diye gaye tamaam steps ke baad bhi masla hal na ho toh iska matlab hai ke Light Sensor hi kharab hai. Aisi soorat mein kisi mobile repairing expert se raabta karein taake woh sensor ko replace ya repair kar sake.
✅ Is guide ko follow karke zyada tar Auto Brightness ke masail ghar baithe hal kiye ja sakte hain.
tags and topics about Smartphones mein Auto Brightness ka Masla Kaise Theek Karein
auto brightness problem, smartphone brightness issue, fix auto brightness, mobile light sensor not working, adaptive brightness not working, how to fix brightness problem, phone display too dark, android auto brightness issue, iphone brightness not working
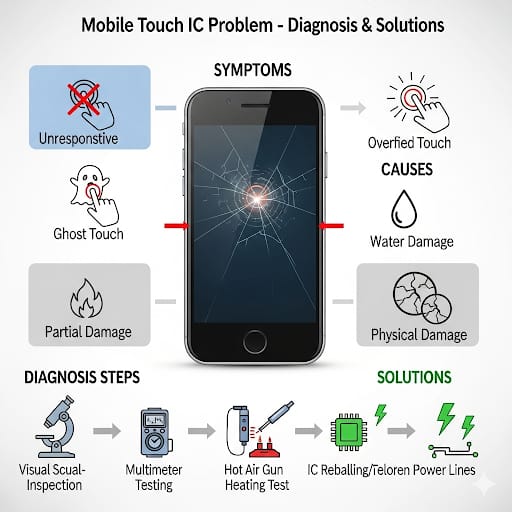
Kabhi aapne dekha hai ke mobile ka touch achanak kaam karna band kar deta hai ya kabhi kabhi respond hi nahi karta? 😟 Users foran display change kar dete hain, lekin asal problem Touch IC ka hota hai. Mobile repairing ke field mein Touch IC ek bohat hi important component hai jo screen ke touch inputs ko motherboard tak transfer karta hai.
Aaj hum samjhenge ke Touch IC problem ke main reasons kya hain, kaise diagnose kiya jata hai aur uske proper solutions kya hain.
🔎 Common Symptoms of Touch IC Problems
Touch not responding at all 🚫 Screen press karne par koi reaction nahi hota.
Partial Touch Issue 🖐️ Screen ka sirf ek part (upper/lower side) kaam karta hai, baqi dead hota hai.
Auto Touch / Ghost Touch 👻 Mobile khud se apps open karne lagta hai ya random touches detect hoti hain.
Laggy Touch Response 🐌 Finger move karne par response late milta hai.
After Display Replacement Issue 🔄 Naya display lagane ke baad bhi touch sahi kaam na kare, iska matlab Touch IC damaged hai.
🛠️ Causes of Touch IC Failure
Overheating & Short Circuit 🔥 Excessive heating se Touch IC jal jata hai.
Water Damage 💧 Moisture se IC ki lines short ho jati hain.
Physical Damage 💥 Mobile girne se IC crack ho jata hai ya soldering break ho jati hai.
Manufacturing Defect ⚙️ Kuch mobiles mein factory se hi weak IC lagayi jati hai jo jaldi kharab ho jati hai.
🔍 Diagnosis – Step by Step
Visual Inspection under Microscope 🔬 Touch IC ke surrounding area ko check karein – burnt marks ya corrosion ka sign milega.
Multimeter Continuity Test 🔋 Touch IC ki lines check karein – broken ya shorted lines foran identify ho jati hain.
Check with Known Good Display 📲 Ek original aur working display connect karke test karein – agar issue waisa hi hai to IC faulty hai.
Heating Test 🔥 Thoda heat dekar IC check karein – agar temporarily work kare to confirm hai IC faulty hai.
🔧 Solutions for Touch IC Problems
Reballing or Reflow 🔄
Agar IC ki soldering loose ho to hot air gun se reflow karein.
Reballing karke IC ko dobara fit karna best practice hai.
Touch IC Replacement 🆕 Agar IC dead ho to replacement hi one and only solution hai. Original quality IC use karein.
Check Power Supply Lines ⚡ Kabhi kabhi issue IC ka nahi hota, balke supply lines ka hota hai. Unko bhi test karein.
Customer Awareness 🗣️ Customer ko bata dein ke touch issue ka solution simple display change se possible nahi hota. Proper IC repairing zaroori hai.
🌟 Expert Tips
Always use original replacement ICs.
Touch IC repair ke liye microscope aur hot air station zaroori hai.
Kabhi bhi low quality ya fake displays use na karein – yeh IC ko jaldi damage kar dete hain.
Proper ESD precautions leni chahiye taake IC dobara kharab na ho.
✅ Meta Description
“Facing touch not working or ghost touch issues? Learn expert diagnosis and solutions for mobile Touch IC problems. Step-by-step guide for technicians to repair Touch IC faults effectively.”
🏷️ Tags (Ready to Paste)
mobile touch ic problem, touch ic repair guide, mobile repairing touch issue, ghost touch solution, mobile hardware faults, touch not working fix, touch ic diagnosis, mobile motherboard repairing
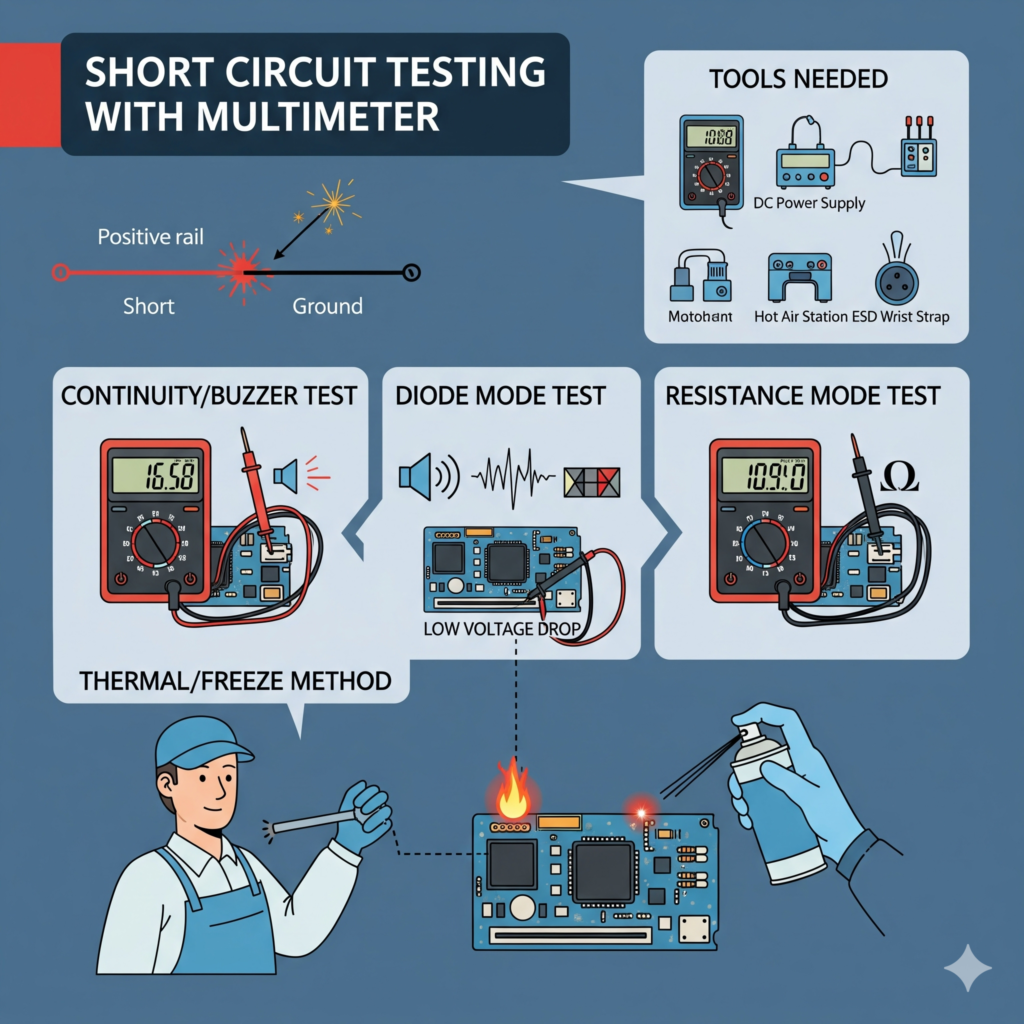
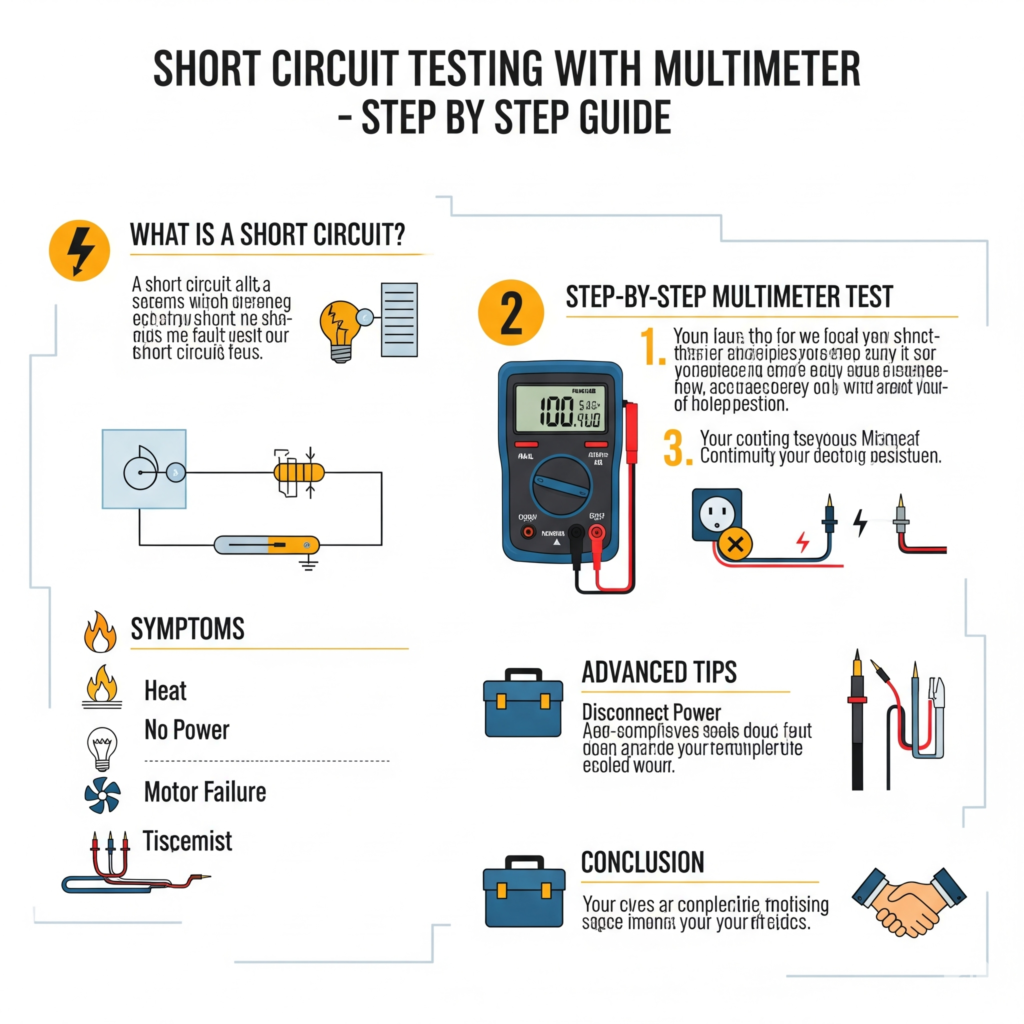
Short Circuit Testing with Multimeter – Step by Step
Short circuit testing with multimeter is a core skill every mobile technician must master. When a phone is dead, overheating, or instantly shutting down on charge, a shorted line is often the culprit. Below is a clear, practical, shop-tested guide to find and fix shorts safely and fast. 🧰🔍
—
🧠 What exactly is a short circuit?
A short happens when a positive rail (VBAT / main power) unintentionally connects to ground (GND). Result: abnormally high current, heat, auto-restart, and sometimes a dead phone. Most common causes: shorted capacitors, damaged ICs, liquid ingress, wrong jumpers, or solder bridges.
—
🧰 Tools you’ll need
Digital multimeter (continuity + diode + resistance modes)
DC power supply (3.8–4.2 V, current limit 2–3 A)
Microscope or good magnifier
Flux, hot air station, soldering iron
Isopropyl alcohol (IPA) and soft brush
Freeze spray / thermal camera (optional but very helpful)
ESD strap + ESD mat (safety first!)
—
🛡️ Safety first (don’t skip!)
Remove the battery before board-level checks.
Work on an ESD-safe surface and wear a wrist strap.
Set DC supply to low voltage first (e.g., 1.0–1.5 V) with current limit.
Avoid overheating the board—use controlled temps and proper preheat.
—
🪛 Step-by-step: Multimeter methods that work
1) Continuity (Buzzer) Test 🔔
Goal: Quickly confirm if a main rail is shorted to ground.
1. Set multimeter to continuity (beep) mode.
2. Black probe on GND, red probe on the main power rail (e.g., big tantalum/ceramic caps near battery connector or PMIC).
3. Beep = continuity. If it beeps solidly between rail and ground, you likely have a short.
4. Repeat on sub-rails (charging line, backlight line, etc.) to narrow down the section.
> Tip: Some rails naturally show low impedance; use diode and resistance modes for confirmation.
—
2) Diode Mode (Forward Voltage Drop) 📉
Goal: Differentiate true short from naturally low readings.
1. Set meter to diode mode.
2. Black probe to GND, red probe to the test point/rail.
3. Healthy rails usually show 0.3–0.7 V (silicon junction range).
4. Reading ≈ 0.00 V or very low → likely hard short.
5. Reverse probes to compare both directions; strange symmetry often signals a shorted capacitor.
—
3) Resistance Mode (Ohms) 🧪
Goal: Compare resistance to ground to judge the severity.
1. Meter on Ω (ohms).
2. Measure from rail to GND.
3. Near 0–2 Ω → hard short. 10–50 Ω → leakage/partial short or a low-impedance rail (cross-check with diode mode).
> Pro move: Compare with a known-good board if available.
—
🔥 Localizing the short fast
4) Thermal/Freeze Method (with DC Supply)
Best real-world trick to spot the hot part.
1. Inject 1.0–1.5 V into the shorted rail at the battery pads (increase slowly if needed).
2. Watch the current draw; a steady high draw confirms the short.
3. Spray freeze spray over the area (or drip IPA).
4. The first component to thaw or evaporate alcohol = your hot/shorted part.
5. Usually it’s a ceramic capacitor near PMIC, charging IC, RF/PA sections, or backlight area.
—
🧩 Isolating sections (smart strategy)
If heat isn’t obvious:
Visually inspect under microscope for burned caps, solder bridges, or corrosion.
Lift one side of inductors/ferrites to isolate sub-rails (power distribution lines).
Remove suspect capacitors one by one on the hot line (start with the biggest caps closest to PMIC/IC).
If removing nearby passives doesn’t clear the short, suspect the IC on that rail (charging IC, PMIC, backlight IC, RF power amp, etc.).
—
🛠️ Repair actions (clean, remove, replace)
1. Ultrasonic/IPA clean liquid-damaged areas first; many shorts disappear after proper cleaning.
2. Remove shorted capacitor (most common). Re-test rail—if the short is gone, replace that cap.
3. If an IC is shorted, consider reballing (BGA) or replace it with a known-good part.
4. For solder bridges, wick the excess solder, add flux, and reflow cleanly.
5. After repair, power the board on DC supply and watch current behavior; then assemble and test with battery.
—
🧠 Pro tips (save time, save boards)
Always confirm with diode + resistance modes before pulling chips.
Don’t inject high voltage too early—start low to avoid collateral damage.
If multiple rails look short, go after the main VBAT/PP main first; many secondary shorts are symptoms.
Keep a small library of known-good readings (diode/ohms) for popular models—huge time saver.
Replace fake chargers/cables for customers; they’re short factories.
After fixing, run a thermal burn-in test: 10–15 minutes on DC supply and then in normal usage.
—
🧯 Common mistakes to avoid
Testing in continuity mode with battery connected (gives false results).
Overheating small components—use moderate airflow and temp.
Skipping cleaning after liquid damage.
Random jumpers without schematics—can create new shorts.
—
✅ Quick checklist (print & pin near your bench)
[ ] Battery removed, ESD on
[ ] Continuity test main rail → beep?
[ ] Diode mode confirmation
[ ] Inject low voltage → observe current
[ ] Freeze/IPA → find hot part
[ ] Remove suspect cap/IC → re-test
[ ] Clean, assemble, long test
—
🔚 Conclusion
Finding shorts isn’t guesswork—it’s a repeatable process. Use your multimeter smartly (continuity + diode + ohms), verify with DC power supply + thermal method, and isolate rails methodically. Most cases end up being a shorted ceramic capacitor; fix cleanly, test thoroughly, and educate the customer to avoid poor chargers and moisture exposure. That’s how you turn a dead board into a quick win. 💪🔧
—
📌 Meta Description (SEO)
Short circuit testing with multimeter explained step by step. Learn continuity, diode, and resistance methods, plus DC power supply + thermal tricks to find and fix shorts fast.
—
🔖 Tags
short circuit testing with multimeter, phone motherboard short fix, mobile short diagnosis guide, diode mode reading mobile repair, dc power supply short finding, how to locate shorted capacitor, pmic rail short solution, smartphone not turning on repair, continuity test mobile board, mobile repair troubleshooting steps
How to Repair Mobile Mic Not Working Issue – Complete Guide
Mobile mic kaam na karna ek common problem hai jo har technician ke paas rozana aati hai. Customer ke liye ye masla chhota lagta hai lekin phone ki basic communication ability khatam kar deta hai – na call mein awaz jati hai, na voice notes record hote hain, aur na hi video recording mein sound hota hai. 😓
Is guide mein main aapko step by step mic issue diagnosis aur repair process samjhata hoon jo practically har workshop mein kaam aati hai.
—
🧠 Mobile Mic Issue Ki Wajehain
Mic kharab hone ki wajah hamesha hardware nahi hoti. Kabhi kabhi simple software glitches bhi responsible hote hain. Chaliye common causes dekhte hain:
🔹 Software Issues
Temporary software bugs ya OS glitch
App-specific mic block (e.g. WhatsApp, Messenger permission issue)
Mic permission disable hona in settings
Firmware crash ya corrupted OS
🔹 Hardware Issues
Dust, moisture, ya corrosion mic hole mein jam jana
Mic IC (audio codec IC) faulty hona
Mic pad / track toot jana (board level damage)
Mic khud short/open ho jana
Water damage ke baad mic ki corrosion
—
🛠️ Step by Step: Mobile Mic Issue Diagnosis
1️⃣ Software Check (Always First)
✔ Restart the phone (temporary glitches fix ho jate hain).
✔ Mic test karo by recording voice note aur video. Agar ek app mein chal raha hai aur doosri mein nahi → issue software side hai.
✔ Settings → Apps → Permissions → Mic access check karo.
✔ Agar issue barqarar hai to firmware flash/update karke test karo.
👉 Agar software se fix ho jaye to board kholne ki zarurat nahi.
—
2️⃣ Hardware Inspection
Agar software clean hai, ab hardware par aayen:
✔ Back cover khol kar mic hole ko brush aur IPA se clean karein.
✔ Agar mic removable (through-hole type) hai to continuity test karo.
✔ Mic ka resistance/diode reading check karo vs ground. Normal reading ~0.3–0.6V hoti hai (model dependent).
✔ Agar reading abnormal hai (0.00 ya infinite) → mic faulty.
—
3️⃣ Jumper & Track Testing (Board Level Repair)
Mic ke dono pads check karo – ek line GND hoti hai aur ek signal line (towards audio IC).
Agar signal pad open hai, to schematic/diagram follow karke jumper lagao.
Jumper sirf high quality wire se karo aur neat finishing rakho.
—
4️⃣ Mic Replacement (Final Solution)
Agar mic khud kharab hai to naya mic replace karo:
1. PCB ko microscope ke neeche rakho.
2. Old mic ko hot air (320–350°C, low airflow) se remove karo.
3. Pads ko clean aur flux lagao.
4. New original mic place karo (orientation note karein).
5. Solder karne ke baad continuity test aur audio test karo.
👉 Replacement ke baad phone ko assemble karke call, voice note aur video recording mein test zaroor karein.
—
🧩 Pro Tips for Technicians
✔ Mic replacement mein hamesha original parts use karo, local cheap mics sound quality kharab kar dete hain.
✔ Agar water damage hai to pehle full board cleaning + drying karo. Sirf mic replace karna long-term kaam nahi karega.
✔ Board par jumper karte waqt zyada heat mat do – nearby SMD parts damage ho sakte hain.
✔ Customer ko suggest karo ke sasta earphone/mic use na karein, ye mic IC damage karte hain.
—
❌ Common Mistakes to Avoid
Software test skip karke direct mic change kar dena (waste of time & part).
Mic ko ulta solder karna (no sound at all).
Track damage hone par bina diagram ke random jumper karna.
Moisture wali board par bina clean kiye mic lagana.
—
✅ Conclusion
Mobile mic issue repair ek systematic process hai – pehle software check karo, phir cleaning, phir continuity test aur end mein replacement/jumper. Zyada cases mein dust, moisture ya faulty mic component responsible hota hai. Proper tools + careful work se ye masla asaan aur profit-friendly repair ban jata hai. 👍🔧
—
📌 Meta Description (SEO)
Learn how to repair mobile mic not working issue with step-by-step diagnosis, software checks, cleaning, jumper tricks, and safe mic replacement guide for technicians.
—
🔖 Tags
mobile mic not working solution, how to repair mobile mic, phone mic replacement guide, mic jumper in mobile repair, mobile microphone issue fix, smartphone mic testing with multimeter, audio ic problem solution, mic not recording voice solution, mobile hardware repair guide, mobile mic troubleshooting steps
Aaj kal ke smartphones fully touchscreen-based devices hain. Agar touch kaam karna band kar de to phone useless ban jata hai – na call attend hoti hai, na apps chalti hain. Touch IC (Integrated Circuit) is system ka main controller hota hai jo screen ke touch signals ko process karta hai. Agar ye IC faulty ho jaye to touch screen totally dead ya abnormal behave karne lagti hai.
Chaliye step by step dekhte hain diagnosis aur repair solutions jo ek technician ko pata honi chahiye. 🔧
—
🧠 Touch IC Fault Ki Common Wajehain
🔹 Software Side
Temporary system lag ya hang issue
Corrupted OS / firmware bug
Screen calibration problem
Fake / low quality touch panel install karna
🔹 Hardware Side
Touch IC (U2401, U1502 etc. model specific) damage ho jana
Water damage ke baad IC ki corrosion
Touch connector ya FPC loose / damaged
Jumper tracks open between touch panel & IC
Overheating ya short circuit se IC dead ho jana
—
🔍 Diagnosis Steps for Touch IC Problem
1️⃣ Software Check
✔ Phone ko restart karo aur safe mode mein test karo.
✔ Agar partial touch kaam karta hai → software bug ho sakta hai.
✔ Firmware update ya full flashing try karo.
✔ Agar problem software se solve ho jaye to board kholne ki zaroorat nahi.
—
2️⃣ Hardware Inspection
✔ Microscope se touch connector check karo – pins bent/oxidized to nahi?
✔ Multimeter se continuity test karo between connector & touch IC pads.
✔ Agar tracks open hain → jumper apply karo.
✔ Agar connector sahi hai lekin touch bilkul kaam nahi karta → IC suspect karo.
—
3️⃣ Touch IC Testing
Multimeter diode mode mein IC pads reading compare karo (good board reference se).
Agar reading abnormal (short/open) hai to IC faulty.
Heating test: mild hot air do, agar touch temporarily kaam kare → IC confirm faulty.
—
4️⃣ Touch IC Replacement (Main Solution)
1. PCB ko microscope ke neeche rakh kar IC identify karo.
2. Hot air station (350–380°C, medium airflow) se IC remove karo.
3. Pads ko clean aur flux lagao.
4. Agar reballing zaroori ho to BGA reballing karke IC dobara place karo.
5. Ya phir naya/original IC solder karo.
6. Phone ko assemble karke test karo (touch smooth chalna chahiye).
—
🧩 Pro Tips for Technicians
✔ Hamesha original IC use karo, local ICs jaldi fail ho jati hain.
✔ Jumper karte waqt diagrams (ZXW / Easy JTAG / PDF schematic) follow karo.
✔ Agar phone paani mein gira ho to full ultrasonic cleaning ke baad hi IC replace karo.
✔ Zyada heat dene se board ke nearby components damage ho jate hain – airflow aur temperature control rakho.
✔ Customer ko sasta duplicate touch lagwane se mana karo – isse IC dobara fail ho sakta hai.
—
❌ Common Mistakes
Direct IC change kar dena bina connector aur jumper track check kiye.
Duplicate IC use karna (short time kaam karta hai).
Board ko zyada overheat karke solder mask aur tracks jalana.
Touch issue ko sirf software samajh kar time waste karna.
—
✅ Conclusion
Mobile touch IC problem ek critical issue hai jo mostly hardware side hota hai. Technician ko systematic approach rakhni chahiye – pehle software flash check karein, phir connector aur tracks, aur end mein IC replacement. Sahi tools aur expertise ke saath ye repair profitable aur reliable ban sakti hai. 👍📱
—
📌 Meta Description (SEO)
Learn how to diagnose and repair mobile touch IC problems with step-by-step solutions, jumper testing, and safe IC replacement guide for technicians.
—
🔖 Tags
mobile touch ic problem solution, how to repair touch ic in phone, smartphone touch not working fix, touch ic replacement guide, mobile repairing touch ic jumper, touch screen not responding solution, mobile ic problems and solutions, touch connector issue in mobile, smartphone touch repair guide, mobile touch troubleshooting steps
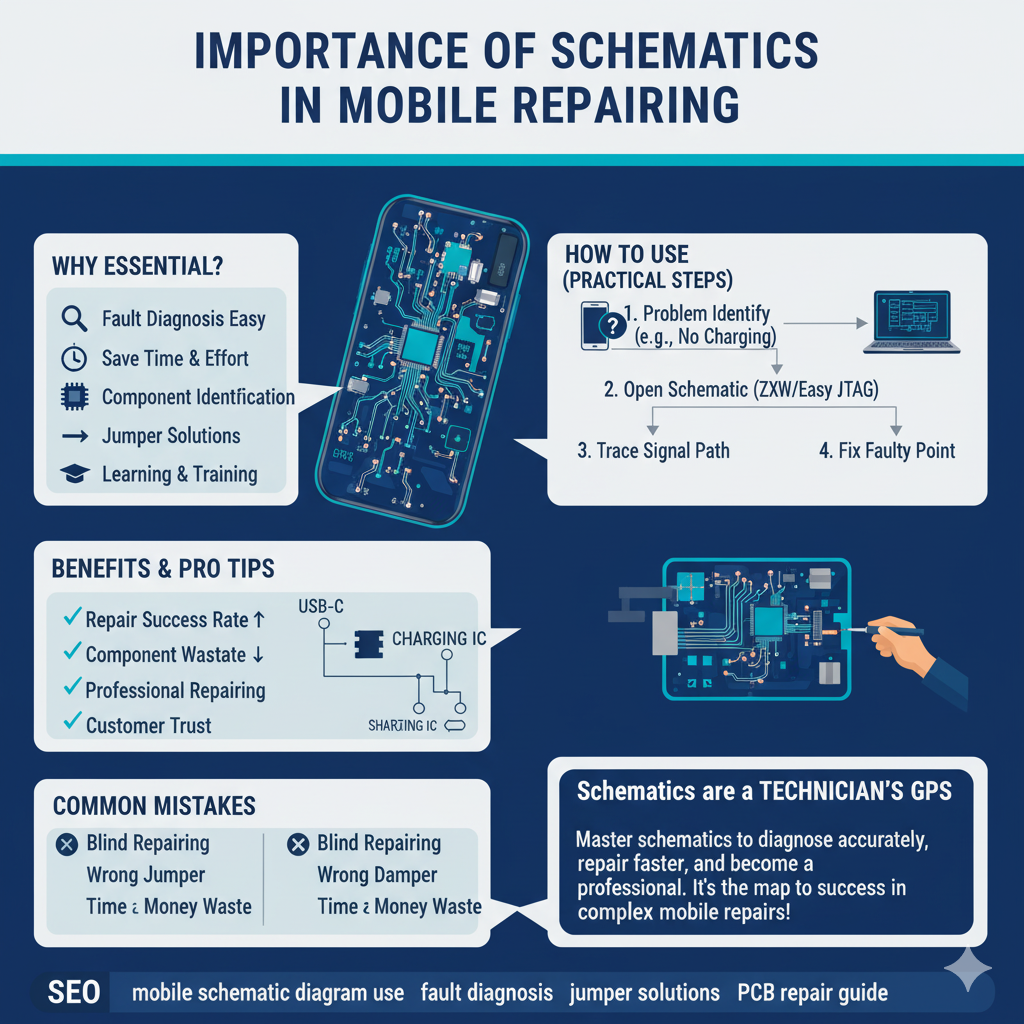
Mobile repairing ka sabse bada challenge ye hota hai ke ek complex motherboard ko samajhna aur correct faulty point identify karna. Aaj ke smartphones mein hazaaron components hote hain – ICs, resistors, capacitors, jumpers aur tracks. Technician ke liye sab kuch yaad rakhna possible nahi hota. Yahan par schematics aur diagrams ka role start hota hai.
Schematics basically ek map hota hai jo mobile phone ke circuit aur connections ko show karta hai. Agar ek technician schematics ko properly samajhta hai to repairing ki accuracy aur speed dono double ho jati hain. Chaliye dekhte hain iski importance aur practical use. 🔧📱
—
🔹 Why Schematics Are Essential in Mobile Repairing
1️⃣ Fault Diagnosis Easy Ho Jata Hai
Agar kisi track mein open ya short hai, schematic ke through aap easily dekh sakte ho ke wo track kahan se kahan connect hai.
2️⃣ Save Time & Effort
Bina schematic ke technician ko har track manually trace karna padta hai. Lekin diagram ke saath direct faulty line identify karna easy hai.
3️⃣ Component Identification
Motherboard par har IC, resistor ya capacitor ka alag number hota hai (like R1203, C405 etc.). Schematic se aapko component ka role aur connection dono pata chal jata hai.
4️⃣ Jumper Solutions
Agar koi pad ya track kharab hai, schematic se alternate jumper points mil jate hain. Ye feature PCB repairing mein life saver hota hai.
5️⃣ Learning & Training
New students ke liye schematics ek visual teacher hota hai. Isse woh components ki location aur kaam dono samajh lete hain.
—
🧑🔧 How to Use Schematics in Real Repairing
🔍 Problem Identify Karo – Jaise “No SIM issue” ya “No charging problem.”
📘 Schematic Open Karo – ZXW, Easy JTAG, Wuxinji jaise tools use karke.
🔗 Signal Path Trace Karo – SIM connector → filter → IC tak ka track follow karo.
🔧 Faulty Point Fix Karo – Jumper, re-soldering, ya replacement depending on damage.
Example: Agar charging IC ka input short hai, schematic se easily dekh sakte ho ke input capacitor aur diode kahan connected hain. Wahan se track follow karke faulty part repair karna easy ho jata hai.
—
⚡ Benefits of Using Schematics
✔ Repair ka success ratio badhta hai
✔ Repeat mistakes avoid hoti hain
✔ Advanced repairing possible ho jata hai (BGA, CPU, EMMC level)
✔ Customer ka trust barhta hai kyunki repairing fast aur accurate hoti hai
✔ Technician ka knowledge aur professionalism improve hota hai
❌ Fault ko wrong diagnose karke zyada damage kar dena
❌ Time aur paisa dono waste karna
—
✅ Conclusion
Schematic diagrams ek mobile repairing technician ke liye GPS ki tarah hote hain. Jaise ek driver bina map ke raste mein gum ho jata hai, waise hi technician bina schematic ke repairing mein atak jata hai. Agar aap ek professional banna chahte ho to schematics ka use daily routine ka part banao.
—
📌 Meta Description (SEO)
Discover the importance of schematics in mobile repairing – learn how circuit diagrams help in fault diagnosis, jumper solutions, and advanced PCB repair.
—
🔖 Tags
importance of schematics in mobile repairing, mobile schematic diagram use, smartphone repairing with schematics, how to read mobile schematics, jumper solutions using schematics, mobile motherboard repair guide, mobile repair circuit diagram, schematic tools for technicians, pcb repair using schematics, mobile hardware troubleshooting with schematics
Smartphone Battery Swelling Problem – Causes and Solutions
Smartphones ki battery humare mobile ka sabse important aur sensitive part hoti hai. Lekin kabhi kabhi aapne dekha hoga ke battery phool jati hai (swelling) ya mobile ka back cover uth jata hai. Ye sirf phone ki performance ko hi affect nahi karta, balke ek dangerous situation bhi create kar sakta hai 🔥⚠️.
Is article me hum janenge ke battery swelling ki wajah kya hoti hai aur technician is issue ko kaise handle kar sakta hai.
—
⚠️ Causes of Battery Swelling
1. Overcharging 🔌
Mobile ko raat bhar charge par lagaye rakhna.
Non-stop charging se battery ke andar chemical reaction ganda hota hai aur gas generate hoti hai.
2. Duplicate Chargers & Cables 🛑
Saste local chargers current ko regulate nahi karte, jis se battery heat aur swell ho jati hai.
3. Excessive Heat 🌡️
Mobile ko dhoop me ya garam jagah par rakhna.
Heat battery ke andar pressure barhata hai.
4. Old Age Battery ⏳
Har lithium-ion battery ki ek life hoti hai (usually 400–500 cycles). Uske baad swelling ki chances barh jate hain.
5. Internal Short Circuit ⚡
Battery ke andar plates ya separators damage ho jaye to gas aur swelling hoti hai.
—
🛠️ Solutions for Technicians
1. Battery Replacement Only 🚫🔧
Swollen battery ko repair karna dangerous hai.
Technician ko hamesha battery replace karni chahiye.
2. Check Charging Circuit 🔍
New battery install karne ke baad charging port, charging IC aur PMIC test karna zaroori hai.
3. Use Original Battery ✅
Duplicate batteries kam price ki hoti hain lekin zyada risk deti hain.
Hamesha branded aur original battery recommend karen.
4. Customer Guidance 📢
Customer ko advise karein ke phone ko overnight charge par na rakhe.
Phone ko dhoop me use na karein aur sasta charger avoid karein.
—
📌 Safety Precautions
Swollen battery ko press na karein ya puncture na karein – ye phat sakti hai.
Faulty battery ko safe recycling bin me dispose karein.
—
✅ Conclusion
Battery swelling ek serious problem hai jo galat charging habits aur duplicate accessories ki wajah se hoti hai. Technician ka role sirf battery replace karna nahi, balke customer ko correct usage aur safety tips batana bhi hai.
Agar timely replacement na kiya jaye to swollen battery se fire hazard tak ho sakta hai. Isliye “Prevention is better than cure.” 👍
—
📌 Meta Description (SEO)
“Learn causes and solutions for smartphone battery swelling problem. Step-by-step repair guide for technicians with safety precautions and customer tips.
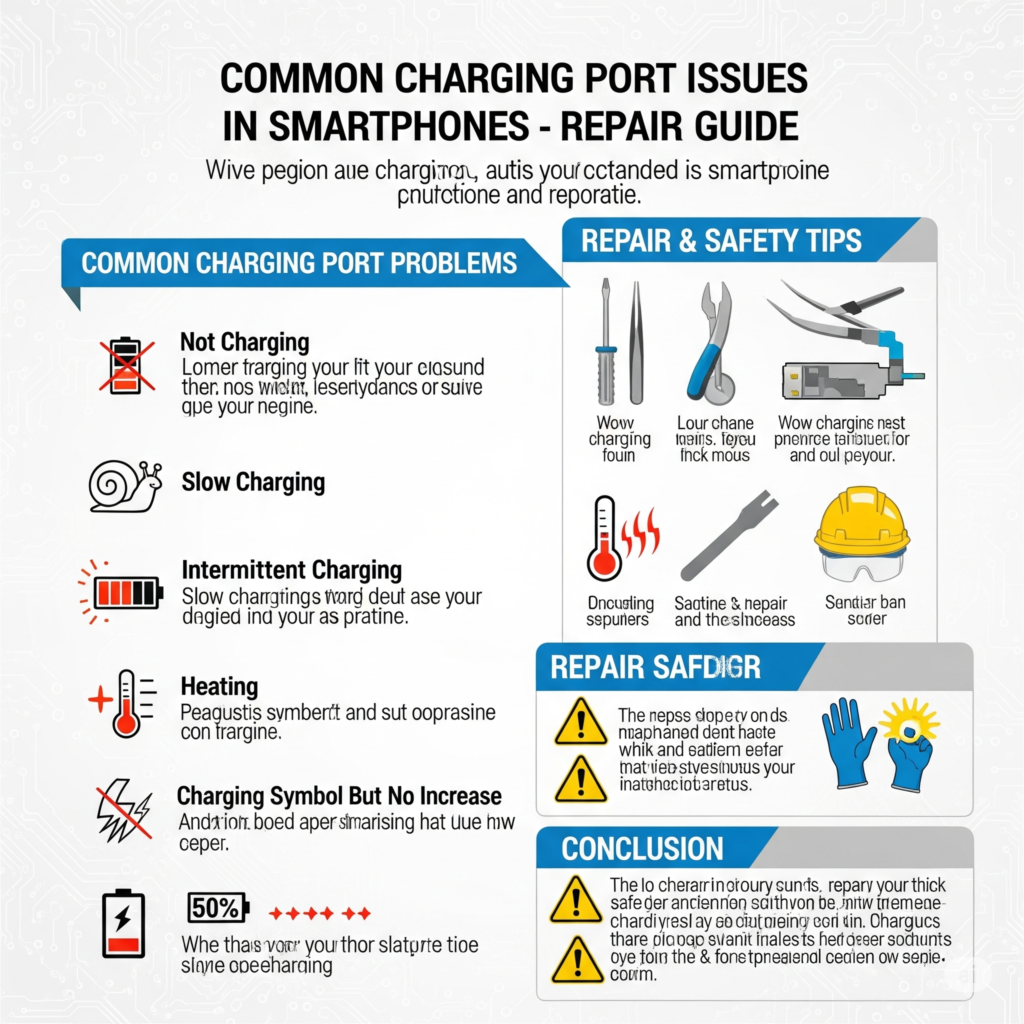
Common Charging Port Issues in Smartphones – Repair Guide
Aaj kal smartphones ka charging port sabse zyada damage hone wala part hai. Kyunki hum phone ko roz bar bar charge karte hain aur charging cable lagate/nikalte rehte hain. Agar charging port me problem ho jaye to mobile dead jaisa lagta hai. Technician ke liye zaroori hai ke wo charging port faults diagnose aur repair karna sahi tarike se jaane.
—
🔎 Common Charging Port Problems
1. Phone Not Charging at All ❌
Cable connect karne par koi response nahi aata.
Causes: Charging port broken, connector lines cut, Power IC issue.
Solution: Port replacement, jumper solution on missing tracks, Power IC test.
2. Slow Charging ⏳
Phone charge hota hai lekin bohot dheere.
Causes: Dust ya rust in port, weak cable, damaged charging IC.
Solution: Port cleaning with IPA, High-quality cable use, Charging IC replace.
Hamesha dust aur carbon cleaning karen before replacement.
Charging port ko heat gun se remove aur soldering iron se fix karein.
PCB tracks damage ho to advanced jumper techniques use karein.
Customer ko cheap local chargers avoid karne ki advice dein.
—
✅ Conclusion
Smartphone charging port issues har technician ke liye common challenge hote hain. Agar correct diagnosis kiya jaye to 90% problems port cleaning ya replacement se solve ho jaati hain. Baaki cases me IC aur jumper solutions lagane ki zaroorat hoti hai.
—
📌 Meta Description (SEO)
“Fix common charging port issues in smartphones like slow charging, heating, not charging, and intermittent connection. Step-by-step repair guide for technicians.
Common Display Problems in Smartphones – Diagnosis and Solutions Smartphone ka sabse important part Display hota hai. Agar display me masla aa jaye to pura phone useless lagta hai. Technicians ke liye display related problems ko diagnose aur repair karna ek basic aur must-have skill hai. Aaj hum is article me discuss karenge common display problems, unki wajah aur unka hal (solutions).
—
🔎 Common Display Problems
1. No Display / Black Screen ❌
Mobile on hota hai lekin screen bilkul black rehti hai.
Causes: Backlight IC kharab, Display connector loose, LCD damage.
Solution: Connector cleaning, Backlight supply check with multimeter, LCD replacement.
2. White Display ⚪
Sirf white light dikhai deti hai, koi text ya image nahi.
Causes: Faulty display, missing data lines, faulty motherboard IC.
Solution: Jumper solution on missing tracks, Display replace.
3. Lines on Screen 📶
Vertical ya horizontal lines appear hoti hain.
Causes: LCD fault, connector issue, motherboard line damage.
Display visible hai, lekin touch response nahi deta.
Causes: Touch IC issue, damaged touch panel, software bugs.
Solution: Touch screen replacement, Touch IC reball/replacement, Software update/flash.
5. Dim Display 🔦
Screen bohot faint ya dim dikh rahi hai.
Causes: Backlight IC, LEDs ya filters faulty.
Solution: Backlight IC replace, LED light test and repair.
6. Flickering Screen ✨
Display kabhi normal aur kabhi blink karta hai.
Causes: Power IC issue, Display connector lose, LCD defect.
Solution: Connector reball, Power IC test, LCD change.
7. Color Distortion 🌈
Colors ulte ya blur dikhte hain.
Causes: Loose connector, LCD damage, motherboard line fault.
Solution: LCD replacement, jumper solution.
—
🛠️ Diagnostic Tips for Technicians
Always check display connector with magnifier & clean with IPA.
Multimeter aur DC power supply ka use karke lines aur voltages measure karein.
Pehle software flashing try karein before hardware replacement.
Customer ko clearly bataein ke LCD replacement hi final solution ho sakta hai.
—
✅ Conclusion
Smartphone display problems multiple types ke ho sakte hain – black screen, white display, touch issues, flickering ya dim light. Technician ka kaam hai correct diagnosis karna aur right solution apply karna. Remember: “Har display problem ka solution hai, sirf correct check-up aur tools chahiye.”
—
📌 Meta Description (SEO)
“Learn common smartphone display problems like black screen, lines, dim display & touch issues. Step-by-step diagnosis and repair solutions for mobile technicians.”